 This blog is about "Preparing your Mastering Engineer". Recently, I have been doing my first real set of tracks for mastering. The first I would consider worthy of mastering and therefor, have spent a lot of time trying to make it as smooth as possible, especially when dealing with mastering engineers via internet. Being in Japan, leaves me with only SUPER EXPENSIVE options for mastering, and, less chill communications. No discrimination intended, but you really want to be able to explain yourself to your mastering engineer. Anyway, I have made MANY mistakes (THANKS RICH!!!!!), and luckily, my engineer has been patient with me. Anyone can get a track mastered, but if the track was SHIT in the first place, it doesnt magically become gold. "You cant scrub rocks into diamonds". Anyway, I am going to go over some of the important things to think about before mastering a track, and a few things about how to make your mastering engineers job easier. This is coming from the musicians point of view, and I know that mastering engineers out there will probably say "YOU GOTTA DO MORE THAN THAT!!!!"...but, these are just some of the common mistakes I made in the beginning, or at least realized through reading some books and discussing with people on ableton forums. (great by the way!)
Lets start with some really basic things that seem to be the source of a lot of problems. I will be talking about ableton live, but these ideas can be applied to other DAWs.
Also, my mastering engineer doesnt JUST master...he also cleans up tracks a little one by one, and does some adjustments to the levels of bass, kick because I cannot turn my speakers up to club level where I live. This is important. So, I send tracks one by one when exporting....and let my engineer do a little bit more fancy work with the mastering. I am lucky to have a very hardworking and caring engineer. This is partly mixing and partly mastering.
1. Bad samples. Get in a habit of checking your samples. Dont go too fast, and do it WHILE you are making the track. It takes one second to make sure the sample is not bad. I have noticed that some samples are already clipping in their original form...even important things such as kicks, etc. MAKE SURE its not clipping. If it is, DONT USE IT. Find a better sample. This is a shot of one of my kicks I made a mistake on. Im a dumb ass!
 That was the kick on greatest composer. It was bad from the start.
2. Make sure YOU DONT CLIP the samples. Remember in ableton, just because your master is set to -WHATEVER, or 0...you can still be clipping your actual samples and synthesizers. Its important to put a spectrum RIGHT AFTER your samples (not at the end of an effects chain) and check out samples periodically as you make tracks. Sometimes, it might not be smart to get "OUT OF THE GROOVE" to do it, but when you are finished, just go back and check them out. Make sure within your simpler or sampler, your sample is running below 0db at least. Also make sure your wav samples are not clipping either by moving the fader in clip view. Look at the TOPS AND BOTTOMS of the samples as you move it to make sure it isnt already infact cut off (bad sample). You dont want to use those....
3. Make sure your levels were made to go to mastering in the first place. General rule of thumb...set your KICK at -12 db, and build from there. It is unlikely that you will go much higher than your kick. Then, you can leave your track with enough headroom (AT LEAST -6db) for your mastering engineer. Have your MASTER set to 0 also. Dont move it! This is not a volume control knob remember....it is your MASTER FADER. You are composing. If you have to change the volume...you should have something AFTER the master to do that.
4. Compressors on the master bus off! You can argue with me...but, master compressors are a no, no I think...especially with good mastering engineers. They have some great compressors, i let them handle that. All compressors doing side chaining or maybe working within your tracks can stay on if you like. If your engineer is going to apply them individually, then shut them off. But you can be inhibiting on artistic creations at this point...so its up to you.
5. Dont forget to export your tracks in the specifications of your mastering studio. Wav, AIF, 24bit, 16bit...hopefully its the highest possible...but ask.
5. Ok this is a long one. And will continue into 5 and 6 etc....and has more to do with the preparation of your tracks. Ok....NAMING AND GROUPING. First off, name your tracks something similar to the sound. It helps to remember things, and especially for the engineer who will be working with it. Now, since you will be sending your tracks as individual files....once its sent...and if being put into another program to work with...the order will be different from yours. This is why it is important to put NUMBERS beside that name, in the ORDER that you have them in YOUR TRACK. That way, it will be accepted into the other program in the same ORDER.

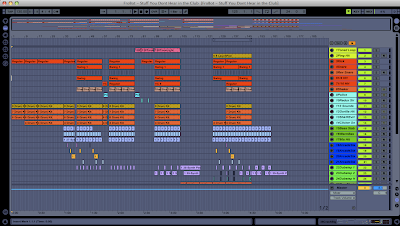
6. This brings me to Grouping & Color Coting. Now, if your engineer will be changing ANY LEVELS at all...this is important. In my case, since I cannot turn the speakers up to club level, my engineer must adjust the bass and kick in perspective to the REST of my track. Now this is dangerous because you may artistically have some things that need to be raised at the same time when other elements are being raised. Such as if you have a reverse snare with your snares that you dont want its perspective to the snare changed. Or if you have a 2 bass combination that are on separate tracks that need to be raised together. Tons of other reasons too. This is why, you GROUP your tracks and color cote them. Put things in color groups that may need raised accordingly if another element is being raised. Hopefully, you have a club music competent engineer, who should be able to notice this...but it really helps them understand your interpretation of the elements as groups. You will send off a screen shot of your track, which will then MATCH theirs, and they can even color cote them easily...looking at the numbers before the tracks, and making it easier for them. They will thank you for the headache gone. Some engineers might not care, but I have noticed ones that love having that...especially when communication is limited to skype and emails. One of the hardest things is feeling the musicians personality and style without meeting them and hearing them talk about their own tracks. Its not just FACTS that need worked with....your feeling and attitude must be perceived in the mix too. Its good to give as much OTHER information about your opinions of a track when these are limited.
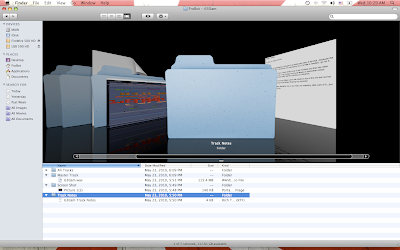
7. So, now you have the track all ready to go, now its time to get it in folders that are great for your engineer to stay organize. I make 4 folders. Put them all in a folder labeled "Composer Name" + "Track Name"
A. All Tracks (these are the individual track files) (PS Make sure to delete your return tracks that were automatically exported into this folder if you didnt use them. They will be easily found in your folder because they are not NUMBERED like your other files)
B. Track Notes (These are all track notes for the track. SOOOOOO important. Write the bpm here, and everything you might want the engineer to do. This is by far the most important part in helping your engineer understand what you want)
C. Master Track (Move the master track from the exported folder and put it into its own folder. Ask specifically that your engineer take a listen once or twice through (which they usually do anyway) before starting to work with it. Sometimes, when an engineer is busy and has like 7 or 10 tracks to do...they might speed through it. Hopefully, your engineer doesnt)
D. Screen Shots (Send screen shots of your track with the colors and numbers so they have something to look at. It helps to see what the composer was seeing)
 8. Finally, zip those files, and then you will most likely be uploading them to a drop box.
Keep in mind, some engineers might ask for all the wav files to be converted into flac files before sending due to size. You may have to do this also...especially when doing tons of tracks at the same time.
Anyway, these are just a few things to keep in minding when sending your track to be worked on. Again, a lot of these things dont matter if you are using a master track to master it...like a lot of people do. But if you find yourself in the situation where your engineer will be working on individual tracks...these are important things to keep in mind. Remember, the more professional you come off as from a technical standpoint, the more likely the engineer will feel to work professionally on your track.
And I know everyone has had a their first experience when receiving their shitty track back from mastering...and have totally questioned their skills as a producers...and thinking they will SUCK FOREVER as a musician. Its not that, just take care of your tracks before mastering them, because you ultimately have the control over your track.
ADDED NOTE 5.27.2010 - Dont add symbols to your files names. Some other programs wont take them. I learned the hard way and had to upload twice.
Peace!
FroBot


