Showing posts with label ableton. Show all posts

Tuesday, June 15, 2010

ABLETON LIVE VOTED BEST DAW IN THE WORLD

Original link - http://www.synthtopia.com/content/2010/06/15/ableton-live-voted-the-best-digital-audio-workstation-in-the-world/

Ableton Live has been voted “Best DAW In The World” by readers of Synthtopia.com, one of the leading Internet destinations for electronic music information.

Over 5,000 votes from around the world were cast in Synthtopia’s Best DAW In The World Poll. This poll is thought to be the largest poll of its kind.

The top position was hotly contested by FL Studio, which garnered 24% of the votes, compared to the 25% of Ableton Live.

Other popular DAW’s included Apple Logic, Cockos Reaper, Cubase, Propellerhead Reason/Record & Cakewalk Sonar.

The Top 10 DAW’s In The World

  1. Ableton Live - 25%
  2. FL Studio - 24%
  3. Apple Logic - 13%
  4. Cockos Reaper - 12%
  5. Cubase - 6%
  6. Propellerhead Reason + Record - 5%
  7. Cakewalk sonar - 3%
  8. Avid Pro Tools - 3%
  9. Apple GarageBand – 1%
  10. Sony Acid – 1%

Other options, including Steinberg Nuendo, Renoise, PresSonus Studio One, MOTU Digital Performer, Ardour, Adobe Audition, Dr T’s Keyboard Controlled Sequencer, Nanoloop, Mackie Tracktion, got 1% or less of the votes.

Write-ins were also allowed. (See the complete list below.) Some of the stranger write-in options were “iDunno”, “the one you use” and “mama’s cake.”

The Best DAW poll results are sure to be controversial – so weigh in with your thoughts on the results.

And if you’ve got ideas on how we could improve future polls, let us know!

About The Best DAW Poll

This poll represents the subjective opinion of readers of Synthtopia.com, rather than an objective comparison of features of the various DAWs. As such, it is influenced by the makeup of the readership of Synthtopia & the relative strength of each DAW’s online user community.

For the purposes of this poll, options were presented in random order for voting.

Some evidence of ballot-stuffing was identified early on, so voters were limited to one vote, by cookie & IP address, for the majority of the poll.

Write-ins included:

  • amplitude 6
  • Orion 6
  • Samplitude 5
  • Audacity 4
  • Reaper 3
  • Fork 2
  • reaper 2
  • Bhajis Loops 2
  • EnergyXT 2
  • Buzz 2
  • Mixcraft 5 1
  • lmms 1
  • Mixcraft 1
  • Question is non sensical 1
  • reason 1
  • Protools 1
  • Sawstudio 1
  • sequoia 1
  • Studio Vision Pro 1
  • Energy XT 2.5.2 1
  • ars ‘n’ Pipes (amiga) 1
  • maschine 1
  • bars and pipes 1
  • iDunno 1
  • synapse orion platinum 1
  • proppellahed 1
  • Mu.Lab 3 1
  • only know ableton, but it’s not a base for decision 1
  • lsdj 1
  • Jeskola Buzz 1
  • orion 1
  • Cool Edit Pro 2.1 1
  • Acoustica Mixcraft 1
  • presonus studio one 1
  • Orion Platinum 1
  • the one you use 1
  • Maschine 1
  • Nuendo 1
  • Zynewave Podium 1
  • Sensomusic Usine 1
  • Audiomulch 1
  • cock 1
  • SawStudio 1
  • there is no ‘best’ 1
  • iSequence for iPad 1
  • Podium 1
  • soundscape 1
  • MINE! 1
  • TESTasto 1
  • gary numan 1
  • Synaspe Orion 1
  • The Law Of Miracles 1
  • mu lab 1
  • energy xt 1
  • soundation studio 1
  • DAWson’s Creek 1
  • pro tools 1
  • ensoniq Paris 1
  • Magix Music Maker 16 Premium 2009 1
  • RaXnTraX 1
  • LMMS 1
  • Project5 1
  • The DAW Of The Dead by Romero 1
  • Sequoia 1
  • mixcraft 1
  • Mixcraft5 1
  • Sony Soundforge 1
  • max/msp 1
  • Pro Tools 8 1
  • cooleditPRO 1
  • Opcode Vision 1
  • Accessible for blind people. Sonar and Reaper come close but not great. 1
  • Propellerheads Record 1
  • mama’s cake 1
GREAT HUH!!!

Saturday, June 5, 2010

To Sample or NOT to Sample


Sampling has its roots deep within the old HIP HOP days, and the very early days of house music. It even goes back to some of the funk days, and even further. Now-a-days, for sample collectors, you can easily fill up multiple hard drives full of samples from free websites, or premium sample packs. The only thing that seems to shine a bad a light on sampling are all the music purists who say "You must make all your own sounds". I want to discuss this idea, and my opinion on it.

First off, I would like to say, I LOVE SAMPLING. It is probably one of my favorite parts of music, and I love trying to have a big collection of samples. Many people will say "Well, if you didnt make the sound, then its not really your music". I totally disagree. Lets talk about why.

Lets also make a distinction between ONE SHOT sounds and LOOPS. Loops...I usually tend to dislike do to the fact that someone already sequenced them. The part of "art" in music which I love the most is the composition element. Making a song from start to finish. So, when I talk about samples, for now, I am not going to talk about loops. I want to talk about actual audio files, one shots, or unique sounds that are not sequenced.

Many experienced producers prefer to make all of their sounds themselves...which is very respectable, and a great way to go about making music. But, sometimes, samples can be extremely well made, and unique in a way that you are unable to reproduce within your means. Lets talk about a few examples -

Real instruments. Now it is totally legit to say "Well, you could go into a studio a record a certain instrument, then use it...therefor making it your own". This is not always totally feasible for many producers for a few reasons. 1st being the cost of studio time to get into the studio. 2nd would be knowing a musician who plays that instrument (good luck finding a professional KOTO player in AMERICA, or a bad ass ukulele player in China). 3rd is the certain tools that the sampling artist had at their disposal while making the sample (programs, synthesizers, re sampling gear, high end audio equipment, good mics, etc). 4th is the extreme knowledge that some sampling artists have about making samples in the first place...which can make their samples extremely high quality and original. 5th is the location at the disposal of the sampling artist in which to make those samples. 6th is the time that the sampling artist may have taken to make the sound due to the fact that their artistic love comes from "MAKING SAMPLES" rather than a producer who usually loves the composition aspect of music.

Taking into account all these factors, from a composers standpoint, it might be good then to use sample one shots of these instruments. This is especially nice when someone has multi-sampled an instrument and you can then plug it in like a real instrument. I tend to like these MORE than synthesizers a lot of the time due to the more "real life" sound. Also, with programs like simpler...its easy just to take one sample, and as long as you arent transposing it too far, playing that one sample like an instrument on your midi keyboard. This is especially good for classic instruments like pianos, rhodes chords, violins, etc.

Now lets talk about synth samples, which a lot of producers will say is cheating because you can design your OWN synth sounds. Ok, yea, I get it....get off your high horse producers. Yes, you can learn how to make your own sounds with synthesizers...as you SHOULD know how to do it if you plan to be any what of a good producer...because sometimes you will need to CREATE the missing element of your track that a sample just wont provide. But, that being said....some sampling artists have spent HUNDREDS of hours just making nice one shot samples using multiple synth chains that you...in a million years, could never re-create without those exact tools at your disposal. This is especially true for old analog gear that has a special sound, especially when put with other synths, re-sampled, etc etc. There is no reason why not to use those samples if they sound good in a track. Again, with programs like SIMPLER & SAMPLER....you can make the sound fit the song perfectly, or alter it completely from its original form if you like.

***I like to think of it like this, when some producers think that sampling is cheating. Ok....so, a guitar is an instrument right. It makes certain sounds ONLY. You cant make an acoustic guitar play a piano sound, or vice versa...the science is totally different. So, you will only ever get an acoustic guitar sound OUT OF an acoustic guitar. THAT IS THE INSTRUMENT. Well, each individual SYNTH SOUND ever created is like its own instrument in a way. (I know you can say that the SYNTHESIZER is the instrument, but, from the point of what sound is being made, you can think of EACH sound as its own instrument if that sound was being made by an instrument that ONLY played that sound). So, you have this really awesome UNIQUE synth sample....a one shot. It, in my mind, is NOW like its OWN INSTRUMENT...especially when put into simpler. Now, have you ever heard someone complain "Well...Bob Dylan already played a guitar...so no one else should be able to play a guitar sound...or else that is copying and unoriginal". NO! Because it is an INSTRUMENT. It makes tons of different sounds depending on how you play it...and people LIKE the sound of guitar...so many people play it. Well a synth sample is the same way. It can be a nice sound, so, there is nothing wrong with playing it again, and again, and again...in different ways...especially if it is a really good sound.***

Now, this does not mean that you should just be tossing in tons of samples, un-altered, and making tracks 100% solely out of unoriginal samples (you could, any many people do...but that isnt a very good idea in my opinion). But, using super sweet samples made in ways that you could never create can make your tracks stand out and sound amazing.

Some dance producers might say "Well if you cant make it, then learn how to make it". Yea, easier said than done my friend. Like I said before, some of these samples come from sampling professionals...who dedicate their whole career to making high quality samples. Just like a guitar maker might spend his whole life making HIGH QUALITY guitars. That doesnt mean that a guitarist needs to go out and make his own guitar....he likes PLAYING the guitar....making it...may just not be his forte. Well, samples are the same way. No matter how good you are, some samples are just impossible to recreate. Sometimes, they are almost like magical gifts from god....in a sense...because there are so many thousands of parameter possibilities, gear possibilities, recording situation possibilities, that go into making some samples. We all need to be a little more humble, and realize that no matter HOW good we are at something, these is always someone who is a little bit better because they specialize in a small detail of music more than you do.

I love to make large drum racks in ableton full of different samples too, because sometimes...using samples can trigger neural connections in your brain...which then will trigger or spawn new ideas when you are playing. Even if you dont USE a particular sample in a track...just hearing it over top of your track (being tapped in from a drum rack) can give you an idea. And thats the name of the game....ideas.

When music first started, and even more so...music business, each person had a different role in the recording process. An artist was an artist, a mixing engineer was a mixing engineer, a producer was a producer, a composer was a composer....that was pretty much how it worked. Now-a-days, and especially with DANCE MUSIC...people are taking ALL OF THOSE ROLES, to the extreme, and doing it all! This is not an easy thing to do! Especially hard for those musicians with no music education, and for those who take up music as a hobby more so than a profession. Even if you are totally educated...there is another problem...time management. You need to be having 8 hour a day sessions everyday if you plan to do EVERYTHING yourself...from sampling, recording, composing, mixing, mastering, promotion, & on top of that DJing. Its a full time job...and unless you are rich or signed to a good record label...um...you gotta put food on the table too. So, when a purist asshole starts telling you "You sampled that...cheater"...tell them to fuck off and stop judging art. Its all art....some people have made their livings off of being a COLLAGE artist...but its still ART. Another point about the part of being rich...is that you simply may not be able to afford that sweet synth that you really want....the one that makes those great sounds you want to use. A lot of passionate artists, ones who truly love music and do it all the time, come from a poor background. Its the struggles of life, and the dissatisfaction of a 9-5 job that brings you closer to music. These people are going to make music with whatever they can get their hands on....just like Jimmy Hendrix played a guitar he found in the garbage.

Remember, its ALL music....no matter how you make it. Sampling can be an amazing way to get great sounds into your track....and...with the use of ableton live and in particular "simpler" & "sampler", you can turn high quality samples into your own sounds in no time.

Ok...bring on the "anti-sampling hate talk".....now! Haha!

Peace!

FroBot

Wednesday, June 2, 2010

Keeping Music Less Repetitive With Pitch LFO Tutorial


Ok. So this is a nice little refreshing tip I had kind of forgotten about...but its a charm. In your tracks sometimes, you will be using a sound that repeats. "NO WAY Mr. DANCE PRODUCER" you say? Yea Yea, but, repetitive music doesnt have to be dull. Sometimes, especially percussion elements like blocks, cow bells, bongos, djembes, congas, etc...need to have small variations in them so they sound less computer like. I come from a background of organic instruments, and later found electronic music. So, when I think about a natural instrument being put into a track, I like to decide if I want that sound to actually sound REAL, or sound unnatural. When real is the case, then I like to think about all the factors that go into making that instruments unique sound.

I host full moon drum circles in Osaka here every month under Osaka Castle (rad place by the way). So, I get a chance to think about sound dynamics at least once a month with a bunch of other musicians, and different people each time.

Lets take a djembe so to say. What sounds go into making it different, and how are we going to do that in ableton live.

1. Drummers Strength - This is how hard the drummer is hitting the drum. Easily changed with velocity or volume envelopes.

2. How far away is the drummer? - That is changed with the master volume of the track or tracks.

3. What is the ambiance of that place they are drumming? - Reverbs, volume, even delays can create this.

4. How funky is he? - This is controlled by moving the drums notes forward and backward in time, or applying a groove from the groove pool.

5. Is the drummer letting the drum ring out, or sustaining it with his hand? - This is easily changed by just changing the volume envelope and making it with only an attack...or just shorten the sample.

6. What is the pitch of the drum? Now this is the hard one, and what I want to talk about today.

This is the core fundamental of this idea of changing the pitch of anything with LFOs, so the loop will not sound as boring. For illustration purposes only, I am showing how to do this with a hand drum....but, it can be applied to ALMOST anything, and is especially good for organic rhythmic elements, or really repetitive sounding parts that might annoy you in a mix.

Back to the hand drum now, for those of you who dont know a lot about drums....they actually have TONS of great tones. By moving your hand around the top, around the outside, catching a little bit of wood in the hit, catching a little bit of the hide around the outside, cupping your hands, rolling your fingers, sustaining it all the while....trust me...there are TONS of tones on a hand drum. As a matter of fact, the science of it tells you, that unless the drummer hits in EXACTLY the same place every time...the pitch should be a little different each time...and hand drummers are usually rocking it out hard, and feelin' that groove...and from my experience...hand drummers like to trance out when jamming. So I doubt that their brains are saying "lets make sure I hit in the same place every time." So we need to be able to create that almost RANDOM changing of pitch...but not so drastic as to obviously change the pitch by a semi tone (unless that is the desired effect). This concept can be taken to the extreme and turned into some super fucking awesome effects, but today we are going to talk about how to do it VERY subtly, and turn our boring, stagnant loops into dynamic, realistic, loops.

So, what I am going to do is take a simple bongo loop for now. Usually I would make one using one hits, but for the purpose of this tutorial, its just a background sound for me to add some dynamics to. Since it is an ACTUAL HAND DRUM recording, and not super short, it has real pitch sounds changing in it already. What I want to do is add a few extra attack drum taps to liven it up a little, and really make it sound less repetitive. You could do this to ALL of the loops sounds if you wanted to...and you created them all by hand, but sometimes....its good to have a backbone, and then add a few changing sounds into it. Either way can sound good.

So 1 audio track with a bongo loop, 1 midi track with a simpler and a conga one shot hit -

Mine are in yellow -


As you can see, I am only using the attack sound of the conga hit because I just want to add a few of those drum hits where the drummer mutes the sound of the drum after they hit it. More of a high pitched THWACK!

Now I am going to play my bongo loop and record a few extra drum hits. I am also going to move the midi notes around a little bit until I get something I like -

This is what I came up with. I had to shut the grid off to get them just right. Just a couple extra drum hits. I also tuned it so its in the same pitch as the other drum loop.

So, now we have a couple nice sounding attacky drum hits to add some dynamics to this repetitive sound. Now, please keep in mind, this is just a basic example. If you were to really take care of your drum loop, and use all one hits, separating them on a couple different tracks, and then use the following method...you can get beautiful changing sounds, or you could get a total sloppy mess. That is why I am showing you this in more of a TOOL fashion, because in this explanation, we are using it SO subtly, that, if applied right, should almost be unable to be noticed when listening to the WHOLE track.

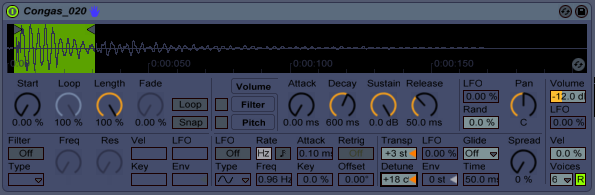
First thing we are going to want to do is turn on the LFO in the middle of the simpler -

Also make sure RETRIG is OFF because we dont want it to re-trigger the LFO every time or that would then become a predictable change and would still make the drum hits repetitive.

Now, what we want to do, is use the pitch LFO (beside the transp) and change the rate (freq) a little bit to get a subtle changing of pitch.

For the purpose of understanding what is going on here, put the LFO up quite a bit and just start tapping your simpler (with midi controller or keyboard) and watch the pitch go up and down.

What we want to do is do that SO subtly, that it is working within the detune range of the sound, and just making it sound less boring.

I ended up coming up with these very SMALL parameters for my rate (freq) and LFO -

Now, if this was done correctly, you should almost be UNABLE to notice the difference. But, over time...this can amount to a lot. Especially if you apply it to other corresponding rhythms. Sometimes, it may be nice to have one of the more dominant rhythm parts, something sitting in the lower frequencies...to be unchanged at all. So it holds everything together, and then use this method on the other smaller, less bassy percussion. This is just MY idea, and from my experience, how I like it to work. You can however apply pitch LFOs to everything, and if you mastered this idea...using multiple tracks to make your rhythmic percussion, you could in theory, recreate the unpredictable, yet kind of predictable sounds of any organic percussion instrument.

Also, keep in mind, if you apply this technique (or any pitch LFO technique) to other sounds like synth stabs, pads, tech house bass etc etc etc, you get some fabulous results. Again, this was an example of thinking long term with your rhythm, but go wild with your pitch envelopes & LFOs. They can be really surprising.

Hope this helped! Keep makin tunes!!!

FroBot

Tuesday, June 1, 2010

Side-Chain Fast Percussion Tutorial

Most of you dance music producers are familiar with side chaining at this point, and have found the wonders that it can do when applied to a bass track. But side chaining is, more times than not, a tool rather than an effect. Recently, I have been judging dance producers knowledge of music around the concept of side chaining, and how much they use it. Side chaining is an extremely useful tool for making sure that your kick punches as strongly as possible. Sometimes, after you make a track, and take it into the club...it just doesnt have the punch it had at home. This can be due to many things, but one of the things can be the sounds you happen to have overlapping your kick. By using side-chain compression, you can make sure your kick stands out on its own, and punches its way through the other sounds in the mix. Today, I am going to show some examples of where to use this, specifically with 1/16 note high hats, but it is also important for other fast percussion elements.

When I say "fast percussion", I mean high hats, hand drums, snare rolls, claves, cow bells...ANYTHING rhythmic and fast that happens to have a transient on the kick.

As I mentioned before, when I listen to tracks, I specifically listen to if an artist used these techniques when making their track. When side chaining percussion, its almost as if you "MUST" do it, rather than an artistic choice. Its up there with EQing, and mastering...things you must do to get maximum clarity and pump. If an artist just left his 1/16 note HHs without any compression or volume change on the kick transients, something in my head says "ahhhh, he doesnt know that concept". I actually went back, after learning these techniques, and fixed all my old tracks up before sending them to get mastered. It made a world of difference.

A few things I want to note to beginners. I know, when you start making music, you will first hear the word SIDE-CHAIN. And I know its normal to then think, "oh shit, I have to side-chain my music if I want it to sound good". This is so far from the truth you wouldnt believe it. Side-chaining is no more than another creative tool that should be applied when it is needed. Its basic purpose is to allow room for another sound to shine through or hide in the background...however, that being said, it has become a creative weapon in the arsenal of producers due to its feature exploitation. Amazing little bugger. But, before using a side-chain compressor, think to yourself "Does this need side chained". "Are 2 elements conflicting?" "Should one sound be lowered when the other one is playing?" If nothing is conflicting, then more times than not, side-chaining wont be of much use. (in a tool sense, I do not mean in an artistic sense like side chaining pads or whatnot). So make sure you understand what side-chaining actually does, before you go applying it randomly. A few hours with a few books about compressors, and ableton tutorials, and you should be up to speed a little bit....so do yourself a favor, and do it before applying these ideas.

So lets start with what we are actually doing with the side chain compressor. Its a pretty simple concept. Pretty much, you are letting the kick activate the compressor...so every time the kick hits, the volume of whatever you have the compressor on, goes down when the kick hits. Basically, ALL you are doing is changing the volume (GAIN REDUCTION). The reason we do this, is because, have you ever looked at a kick by iteself on a spectrum. It is a beautiful display of rolling frequencies. Kicks are elegant artistic pieces....amazing displays of frequency carving. They are so beautiful, and so powerful...that we want them to HOG the show, when its their turn to shine. They get to shine "4 to the floor"...and we want to make sure they receive their full, unaltered glory. When leaving a sound like a HH sitting on top of it, it will...more times than not, just weaken your kick in one way or another. We need to try to keep our fast, rhythmic elements noticed, but not causing problems. Also, due to our brains "concept of comparison", we perceive the rhythmic parts in a different way as they cut in and out really fast...especially when the kick stands out in between them giving them quick changing dynamics....ALL in a rhythmic fashion.

So before I go any further, I want to talk about how to make sure your fast percussion is clean WITHOUT using side chaining. This is most easily done when working with midi notes, but can also be done in the clip editor, in the volume envelopes of an audio clip. So lets look at a 1/16 note HH track...just tapped in and quantized for now.


These are just some midi notes launching a quick HH sound. Now, the easiest way to act as your own compressor in a sense, is just to change the velocity of the midi notes where the kicks hit. This is KIND OF what the compressor does...but, you just change the volume of it in its original form. Bring the volume down on the HHs where the kick transients are like this -

Now something you should keep in mind when using the midi approach, is that, you may need to alter the 2nd midi note (one after the kick attack), if your kick has a long tail. If your kick is longer than 1/16 of a bar, you may still be ruining a part of your kick by bringing in the percussion so quickly. You also can use the volume envelope in the midi editor to control it instead of your velocity bars -


If I were doing it with a sample, I would use the envelope editor in the clip editor and draw down the volume where the kick hits. This is a shaker sample loop -


Its nice this way because you can bring the volumes up in different spots to change the whole sound of the loop.

Now, by doing these methods, you will run into less problems in general with your kick and fast percussion. But another way, and a fun, sometimes almost unpredictable way, is to use side chain compression. You can either try using a fast percussion with the volume envelopes changed and fixed, or, just try using a regular loop...where there are definitely conflicting sounds between the kick and same transient hits of the fast percussion.

Of course, you will need a kick track, and a compressor on your fast percussion track.


Now activate the side chain within the compressor (push the little arrow first to open up side chain), and select your kick as the input -


Now, for those of you who dont understand your compressors, I am not going to go into all of it. Study your compressors, they are your friend. But I do want to add a few notes about options at this point.

***Most of you ABLETON USERS who are pretty familiar with your compressor, may have noticed, and heard other people noticing, that FF1 mode "clips" less that FF2 mode. Ive noticed it, and many others on the ableton message boards have said it. BUT...in this situation, where side chaining your fast percussion...it is TOTALLY WORTH IT to try both modes. When I do my HH side chaining, some of the results I get out of FF2 mode are great!!!! Especially when changing between PEAK & RMS mode. Some of the results you get from the high hats, can sometimes become monsters of their own...sounding NOTHING like the original sample. So, I do recommend playing around with FF2 mode, as well as FF1 mode when trying this type of side chaining.***

So anyway, back to where we were. I am going to choose FF2 mode for now, since I like it here, and leave the compressor on PEAK now so the attack stage sounds nice...put my ratio up just a smidge so it brings the volume down a little bit more, drop my threshold, and see what I get. I also need to play around with my attack and release parameters. Again, these parts can really change up the whole sound of the fast percussion -


I actually ended up liking RMS mode better here after putting it in. But like I said, changing between ALL THE PARAMETERS here really can give you some interesting outcomes....more so than any other side chain application I have tried....I am always just dumbfounded at the amazing HH sounds I get out of this...even using parameters that a sound engineer would look at you and be like "NO WAY MAN"...it really gets into an artistic realm here just by chaining the modes of the compressor, and can make totally unpredictable (or predictable) rhythms.

Well anyway, hope that helped. I think this is a really important part in getting your fast percussion to sit nicely without causing problems in your mix. You can even try side chaining it with your snares, or other things that would make sense here. But, dont forget, you ultimately make the decision of what you want to stand out....and that doesnt mean going to your volume fader and moving it up.

Peace!

FroBot

Sunday, May 30, 2010

Symmetric Panning Automation in Ableton Live


I love this picture. Because it really makes me think of my tracks in terms of panning and my automation. There are lines of symmetry all over this object, and I like to think of the panning plane in the same way. Some people might say its more of a 2D field, left to right, but...there is so much more to panning than just those 2 locations. There is also depth (z axis) (reverbs and anything adding distance to a sound). But what I am going to talk about mostly today is the symmetry of the panning. Where in fact you have your left and right sounds sitting, and how, if not looked at properly, will make your track lean to one side or another (which I dont usually desire, so I try to stay pretty symmetric. You can use it artistically of course).

For some sounds, staying straight up the middle is a good idea. Your kick & bass for instance are generally best sitting up the middle...especially in climactic parts. Its good to have the weight of the track distributed equally. Sometimes, its really good to throw a utility plug on your synth sound or bass sample, and choose either the right or left side only as the audio source. This will make sure the bass is in fact mono and evenly distributed. This does not mean that a stereo sounding bass wont work...because they can sometimes sound great...but, if you are using a rather sine wave sounding bass....its probably better just to use a mono source. You can add a little bit of your own stereo dynamics if you like, and make sure that it is evenly distributed over the left and right channels.

Now, where symmetric panning starts to become important is when you start throwing tons of stabby sounds around. Quick, low or no reverb, attacky sounding stabs especially, but anything can fall into this category really. When you start to make rhythmic variations to your stabs per left and right channel, its important to try to stay symmetric on your left to right bounces. It is especially import to figure out HOW MANY ACTUAL STABS are happening within a 4 or 8 bar measure, and try to make it symmetric from there. I will explain in a moment more in detail, but if you have an even number of stabs, its easier, but in times when you have an odd number of stabs, it might be good to reverse the automation for the next 4 bars so that it balance itself to 10 stabs over 8 bars, or something of the sort. Maybe I am getting ahead of myself, but lets look at some examples of my panning and why I did what I did.

These panning's are coming from my tracks.

So, this is a wider screen of one of the stabs I am using.

So if we zoom in on just 2 sets of those we get this.


Now these are the little nintendo stab sounds at the end of this track.

They are little groups of 3. I know you see 7 notes per clip...but the last one is just a double hit. So look at the first midi clip. When working with 3, one of the main symmetric tricks to do is put ONE of them up the middle, and then another left, and another right. This is an EASY simple trick to make symmetric panning out of 3 sounds.

So in the picture, I do -

LEFT - RIGHT - CENTER, LEFT - RIGHT - CENTER

Now, this is a good start. But we are still left with a problem in our symmetric panning idea. Since you went in this order, you are ACTUALLY swinging the panning right a little bit. Because, if you look in my first clip, I did them BOTH LEFT-RIGHT-CENTER. So the swing still technically swings you FROM THE LEFT....(feel the motion) TO THE RIGHT....then SHARPLY back to center. So you still feel a RIGHT HAND SWING. So, the way you do this, is just REVERSE your automated panning on your next set of stabs, so it swings you the opposite way. Lets look at that same picture again now -


Look at the 2nd set of midi notes. Notice the panning is the opposite now. The 2nd set is

RIGHT, LEFT, CENTER, - RIGHT, LEFT CENTER

This will balance out the first one, and keep the mix symmetric.

Also, since I made my last hit in both groups - CENTER, I can apply a stereo effect like PING PONG DELAY to the last hit, to make them bounce rhythmically in a fading out, panned delay fashion. As I did in this picture of the same part -

Just by THINKING in terms of symmetry, you can help to keep these stabs balanced. What is nice about MATH....is that anything x2 is an even number...so in MOST CASES with repetitive stabs, just doing the opposite thing on the next bar can help to keep it balanced.

Here is another case where by just putting the first and last hits on center helped make the whole thing symmetric. Its not prettiest draw automation, but you get the point. This will then repeat after this -


Now it is also safe to say that ANOTHER GOOD reason to put the first hit CENTER, and then the others on left right....is if you are making any kind of DELAY effect when the volume is being lowered. It helps to keep that stab at the foreground, and then let it disappear in a stereo ping pong delay. In other situations where you are using AUTOPAN, it is also sometimes good to use the automation of it and make sure the very FIRST hit is not panned. It will help the stab stand out on its own, and then disappear with volume and autopan (or a delay effect). This is totally situational, and half the time it will be good this way, the other half, direct stereo panning of the first hit will be more artistic and sound better.

Next is an example of making sure your 1/16 note high hats "center panning" is on the kick, because I am SIDECHAINING my high hats with the kick...because I want it to compress the HHs when the kick hits so as not to ruin the dynamics of the powerful kick. But, we want to make sure that we arent just compressing the LEFT more than the RIGHT, or vice versa. So since I still want panning on my HHs, I just set the first one center (where your kick hits), then start panning it symmetrically until the kick hits again. I only did this on the FIRST kick, and not all of them, since the compressor will still compress rhythmically. I just want that first kick to be nice and even. See below -


Next is another example where the stabs were in sections of 3. So by using the opposite panning on the next section, it helped to balance them out -


This idea can be applied to ANYTHING that stabs in ODD numbers. Just double it, and now its even, and will balance your track out in the long run.

The next is an example where I was using 2 dubstep sounding wobble basses, and they were battling it out one after another. If you notice, I switch the automation between the 2 clips. This helped to balance the sound out also -


Anyway, I think those are enough examples. Its really not that hard of an idea to grasp, just check your panned sections, and listen specifically for symmetry. After you do it for a while, you will naturally do it. Also, I must note, in many situations, you may NOT WANT symmetry. It is an artistic choice 100%, just MY OPINION...is with that being said...many times you also WANT symmetry, and I find, more times than not, you will need to think about it. Especially for percussion items sitting in the background that are mostly creating rhythm. They typically should be symmetric...however, things in the foreground, like big builds, or quarky synth stabs....artistically, you can do with them however you please. Its part of the creative end of panning. You could be the Picasso of panning if you really wanted to make people uncomfortable in the club.

So, the examples I showed you may be hard to understand without audio...but, just take the concept and apply it. Interpretation is half the game in music....so just use the concept of symmetry, and apply it to your work. You may even be able to come up with your own results better than this!

Peace!

FroBot

Tuesday, May 25, 2010

Preparing your Distant Mastering Engineer

This blog is about "Preparing your Mastering Engineer". Recently, I have been doing my first real set of tracks for mastering. The first I would consider worthy of mastering and therefor, have spent a lot of time trying to make it as smooth as possible, especially when dealing with mastering engineers via internet. Being in Japan, leaves me with only SUPER EXPENSIVE options for mastering, and, less chill communications. No discrimination intended, but you really want to be able to explain yourself to your mastering engineer. Anyway, I have made MANY mistakes (THANKS RICH!!!!!), and luckily, my engineer has been patient with me. Anyone can get a track mastered, but if the track was SHIT in the first place, it doesnt magically become gold. "You cant scrub rocks into diamonds". Anyway, I am going to go over some of the important things to think about before mastering a track, and a few things about how to make your mastering engineers job easier. This is coming from the musicians point of view, and I know that mastering engineers out there will probably say "YOU GOTTA DO MORE THAN THAT!!!!"...but, these are just some of the common mistakes I made in the beginning, or at least realized through reading some books and discussing with people on ableton forums. (great by the way!)


Lets start with some really basic things that seem to be the source of a lot of problems. I will be talking about ableton live, but these ideas can be applied to other DAWs.

Also, my mastering engineer doesnt JUST master...he also cleans up tracks a little one by one, and does some adjustments to the levels of bass, kick because I cannot turn my speakers up to club level where I live. This is important. So, I send tracks one by one when exporting....and let my engineer do a little bit more fancy work with the mastering. I am lucky to have a very hardworking and caring engineer. This is partly mixing and partly mastering.

1. Bad samples. Get in a habit of checking your samples. Dont go too fast, and do it WHILE you are making the track. It takes one second to make sure the sample is not bad. I have noticed that some samples are already clipping in their original form...even important things such as kicks, etc. MAKE SURE its not clipping. If it is, DONT USE IT. Find a better sample. This is a shot of one of my kicks I made a mistake on. Im a dumb ass!

That was the kick on greatest composer. It was bad from the start.

2. Make sure YOU DONT CLIP the samples. Remember in ableton, just because your master is set to -WHATEVER, or 0...you can still be clipping your actual samples and synthesizers. Its important to put a spectrum RIGHT AFTER your samples (not at the end of an effects chain) and check out samples periodically as you make tracks. Sometimes, it might not be smart to get "OUT OF THE GROOVE" to do it, but when you are finished, just go back and check them out. Make sure within your simpler or sampler, your sample is running below 0db at least. Also make sure your wav samples are not clipping either by moving the fader in clip view. Look at the TOPS AND BOTTOMS of the samples as you move it to make sure it isnt already infact cut off (bad sample). You dont want to use those....

3. Make sure your levels were made to go to mastering in the first place. General rule of thumb...set your KICK at -12 db, and build from there. It is unlikely that you will go much higher than your kick. Then, you can leave your track with enough headroom (AT LEAST -6db) for your mastering engineer. Have your MASTER set to 0 also. Dont move it! This is not a volume control knob remember....it is your MASTER FADER. You are composing. If you have to change the volume...you should have something AFTER the master to do that.

4. Compressors on the master bus off! You can argue with me...but, master compressors are a no, no I think...especially with good mastering engineers. They have some great compressors, i let them handle that. All compressors doing side chaining or maybe working within your tracks can stay on if you like. If your engineer is going to apply them individually, then shut them off. But you can be inhibiting on artistic creations at this point...so its up to you.

5. Dont forget to export your tracks in the specifications of your mastering studio. Wav, AIF, 24bit, 16bit...hopefully its the highest possible...but ask.

5. Ok this is a long one. And will continue into 5 and 6 etc....and has more to do with the preparation of your tracks. Ok....NAMING AND GROUPING. First off, name your tracks something similar to the sound. It helps to remember things, and especially for the engineer who will be working with it. Now, since you will be sending your tracks as individual files....once its sent...and if being put into another program to work with...the order will be different from yours. This is why it is important to put NUMBERS beside that name, in the ORDER that you have them in YOUR TRACK. That way, it will be accepted into the other program in the same ORDER.


6. This brings me to Grouping & Color Coting. Now, if your engineer will be changing ANY LEVELS at all...this is important. In my case, since I cannot turn the speakers up to club level, my engineer must adjust the bass and kick in perspective to the REST of my track. Now this is dangerous because you may artistically have some things that need to be raised at the same time when other elements are being raised. Such as if you have a reverse snare with your snares that you dont want its perspective to the snare changed. Or if you have a 2 bass combination that are on separate tracks that need to be raised together. Tons of other reasons too. This is why, you GROUP your tracks and color cote them. Put things in color groups that may need raised accordingly if another element is being raised. Hopefully, you have a club music competent engineer, who should be able to notice this...but it really helps them understand your interpretation of the elements as groups. You will send off a screen shot of your track, which will then MATCH theirs, and they can even color cote them easily...looking at the numbers before the tracks, and making it easier for them. They will thank you for the headache gone. Some engineers might not care, but I have noticed ones that love having that...especially when communication is limited to skype and emails. One of the hardest things is feeling the musicians personality and style without meeting them and hearing them talk about their own tracks. Its not just FACTS that need worked with....your feeling and attitude must be perceived in the mix too. Its good to give as much OTHER information about your opinions of a track when these are limited.

7. So, now you have the track all ready to go, now its time to get it in folders that are great for your engineer to stay organize. I make 4 folders. Put them all in a folder labeled "Composer Name" + "Track Name"

A. All Tracks (these are the individual track files) (PS Make sure to delete your return tracks that were automatically exported into this folder if you didnt use them. They will be easily found in your folder because they are not NUMBERED like your other files)

B. Track Notes (These are all track notes for the track. SOOOOOO important. Write the bpm here, and everything you might want the engineer to do. This is by far the most important part in helping your engineer understand what you want)

C. Master Track (Move the master track from the exported folder and put it into its own folder. Ask specifically that your engineer take a listen once or twice through (which they usually do anyway) before starting to work with it. Sometimes, when an engineer is busy and has like 7 or 10 tracks to do...they might speed through it. Hopefully, your engineer doesnt)

D. Screen Shots (Send screen shots of your track with the colors and numbers so they have something to look at. It helps to see what the composer was seeing)

8. Finally, zip those files, and then you will most likely be uploading them to a drop box.

Keep in mind, some engineers might ask for all the wav files to be converted into flac files before sending due to size. You may have to do this also...especially when doing tons of tracks at the same time.

Anyway, these are just a few things to keep in minding when sending your track to be worked on. Again, a lot of these things dont matter if you are using a master track to master it...like a lot of people do. But if you find yourself in the situation where your engineer will be working on individual tracks...these are important things to keep in mind. Remember, the more professional you come off as from a technical standpoint, the more likely the engineer will feel to work professionally on your track.

And I know everyone has had a their first experience when receiving their shitty track back from mastering...and have totally questioned their skills as a producers...and thinking they will SUCK FOREVER as a musician. Its not that, just take care of your tracks before mastering them, because you ultimately have the control over your track.

ADDED NOTE 5.27.2010 - Dont add symbols to your files names. Some other programs wont take them. I learned the hard way and had to upload twice.

Peace!

FroBot

Sunday, May 23, 2010

Reverse Snare in House Music Tutorial


Today, I will talk about something I have come to love when making house music, or any music with a nice forward swing. The reverse snare (or any resonating percussion sound really). This old fashioned technique has been applied to countless songs, and has become more or less a STANDARD rather than an effect. This application of the reverse snare pre-leading a snare or clap...can give your song the total groove you were looking for. It helps put an extra little punch in the groove, and lets to have some massive control over how you want your song to swing. Using this technique with other concepts of moving high hats, snares, percussion...forward and backward in time...can give your song a totally unique swing. You can spend hours upon hours just playing with these ideas, and watch your groove transform from a robotic drum machine, to the groove of heaven. Ha.

As you can see, I find these concepts very important. But again, today, we will just talk about the reverse snare.

Now, in house music, there are multiple places you can put a reverse snare within your drums. Lets talk about some key places...and how I feel about them.

1. (my favorite) On the 2nd snare sound of a 4 bar house loop. (just before 1.4). When making house music, you usually have your snares on the 2nd and 4th bars. Adding a reverse snare as a sort of small build up on the 2nd snare sound will help swing it more than the swing you already have applied to your snares.

2. Same concept as 1, but instead of being on the 2nd snare, you put it on the first.

3. Another cool option is to put it at the very end up the loop, so the reverse snare pre-leads the first kick in the loop. (Somewhere just before 1.4.4). This will give a swing at the very end as it comes around and hits the kick. Caution must be applied here so that your reverse snare length does not hit with the peak of the coming kick.

4. Same concept as 3, but on ANY kick within the loop.

5. Another weird one I hear recently, is right AFTER the 2nd snare. So it swells just after the snare. I dont know what the thinking is behind this, but it does add an interesting swing in the right conditions.

6. Also, adding a reverse snare on any stab element which is standing at the foreground of the song can really swing the stab without actually moving it in time.

Of course there are other reasons to use this...but the main reason is to give a MINI build up to one of your swinging percussion elements. It can be applied at high db levels, or low db levels, each having their own distinct effect on the groove of the track.

Lets begin with how to do it. First off, you are going to need....obviously....kick, snares or claps, an extra snare for reversing, and possibly other 1/16th note elements so you can feel a little more swing of the groove. Its hard to tell a swing with ONLY the elements you are making...and it is best to work on the swing once you really have your sounds chosen already for shakers, and other fast percussive elements. You will feel the TOTAL groove, and not just the groove of the kick, snare, and reverse HH.

So, I am using my elements sections, but you can see, I have added an EXTRA AUDIO TRACK, and an EXTRA midi track (in green) beside my snare to do this reverse snare.

Now, for those of you who are familiar with my elements section, this wont look new. For all of you who dont know what this is, its basically all the pink and red tracks...which make up my drums section. I have other blogs about it. Basically, we will just be using the SIMPLERS within the RED tracks to launch my snares and kick.

So now, pick out a snare and a kick to use. You can put a swing on the snare if you like to really get a nice house groove going. Here is what I got.


My snare is in clip view. If you look closely at the next picture, the snare is not ON the line, its a little forward in time. This is the swing I put on my snares.

Ok. Now that I have a kick and snare going, lets get the reverse snare going. I am going to do this example like my 1. explanation. Just before the 2nd snare sound. So what you will need to do is find a nice resonating snare sound. One that has a little bit of a reverb or at least length to its sound. When we reverse it, we want the sucking sound of that length. If it has a hard attack sound, that is fine too, we will be cutting it off.

Now, take that sound and put it into your BLANK AUDIO TRACK like this.

Now what we want to do is reverse it. It is as easy as pushing the little REV button in the sample box beside the clip editor. This will reverse your sample.

Now. We dont want to use this in audio, we want a little more hands on control of the sound. So we will move it into a simpler, which is within my blank midi track. You can delete your audio track after this. I renamed my simpler midi track to REVERSE SNARE.


Now, you can either draw in a note, or play this with the keyboard or midi controller. Its nice to be able to change the transpose just by pushing buttons at this point so you can make sure your reverse snare and your actual snare are within the same key. Yes, they do have keys. You should even have to use the detune to get these just right. You can even toss on a spectrum to analyze the frequencies and move them closer together if you like...I usually use my ears.

Now, obviously, we just shorten the start point of this sample because of the silence at the beginning. We must also CHOP OFF the attack sound of the snare which is now at the end of the sample. This requires some playing around, but play with the start and stop points until you get a nice sound to work with. You will DEF be changing these in a minute once we put in the midi notes for it, because when heard in contrast with the kick and snare, it will need changed. For now, just get a nice short swooshing sound.

Something else to keep in mind. As you transpose a sample up by semitones, the sample will be played faster (normal science of pitch and speed). So, as you slow it down, the sample will be played back slower. So try whole octave differences even, even double octaves, then shorten the LENGTH of the start and end markers. There are infinite possibilities for swooshing sounds at this point.

Now its time to put a midi note in for you to adjust the timing of. You can either draw it within your midi editor in simpler or play it in. Mine looks like this -

Something else to keep in mind, c3 in the midi editor is the sample being unaffected by pitch...so my note is not in that spot because I played it in. If you DRAW it in, just draw it in at c3 and then use the transpose within the midi clip view to change it manually.

As you can see, it is JUST BEFORE the 1.4 marker because it will be leading into the 2nd snare. Now, we need to move that puppy around with the grid off to get the exact sound we are looking for. Shut your grid off and start moving it forward and backward in time until you hear it sound right. You can adjust the note length also at this point. It would be best to adjust it so it ENDS just as the snare hits....however, sometimes, other cool effects can be made by making it end BEFORE or even AFTER the snare transient hits.

After toying around with those parameters, I came up with this. It ends JUST after the 4th bar because my snares are already SWINGING a little forward in time, so I wanted it to end just as they hit to accentuate the snares swing.

Now, the last little thing is to play with the attack (or other parameters, but attack is important). Because you have jumped forward with your start marker in your reverse snare, there should be a small audio JUMP as it comes in. You want this swoosh to be as smooth as possible leading into your snare (unless artistically you dont, but its a good habit). So adjust your volume attack parameter within simpler. It also doesnt hurt trying your filters attack also if you had a rather "tin like" snare sound and would like to filter out some of the high end, or you had a really deep snare, and you would like to use a higher WHOOSH sound, use a HP to filter it out. You can even just filter it OUT OF THE the attack with the filter envelope. But for now, I will just use the volume attack envelope -

Now, you have a nice little swoosh leading into your snare. Finally, play with the volume. This is arguably the most important step. The volume in which that swoosh is applied, can drastically effect the groove, or more exactly...that little PUSH at the end of the loop. Even a very very small amount can add a lot to your loop. I find myself using this 90% of the time in very SMALL amounts. Even if you put it in some of your track, and then not in others, it can drastically change the groove in different parts of the track, without moving any elements in time. Its a trick on your brain....and to an untrained ear...it just makes their hips move more!

Hope this helped! Keep makin tunes!!!

FroBot