Sweeps can be a super important part of a good dance track. Its really easy to just jump into your sample bucket and pick out a nice matching one, but, if you just know a few simple tricks, they can be really easy to make too. This little tutorial will show you how to make sweeps using Rob Papen's BLUE. Its a nice little synth I like because it has six oscillators. This can be really handy when synth building. You can also use other synths using this method, but I will go into detail on how to do it within Blue. You can take bits and pieces of this tutorial and apply them to any other synth, because the science is still the same.
The first thing you will want to do is open a new session of live, and insert 1 (or 2 or 3 or 4) midi tracks. Make a new clip and draw in a note anywhere on it. Make it the length that you want the sweep to be... like this -
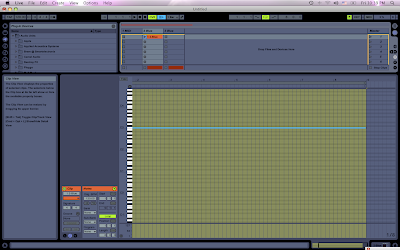
Then drag your clip into the compose view for better use of envelopes. You have more options there than within clip view (however you can do it within clip view if you like by clicking the little envelopes button. Blue will be an option in your envelopes (with ableton 8).
After that, choose your synth. Again, I am using Rob Papen's Blue. Toss that into your midi track. Choose a nice sound that you like, anything steady will do really, because we will be destroying the dynamics of it. Even a simple tone is fine.
Now within blue, within OSC A, you should see a little button that says SEMI. These are your semi tones (or notes). There is a VERY large range considering it is a synth. Within another synth, you just need to find the parameters for the semitones. Just use your mouse to move that little knob, and then jump within your compose view, and your envelope for the semitones should be showing. You need to make a nice straight slope envelope UP or Down depending on which way you want the sweep to go (up or down). In this case I chose up, and in this picture, I am building 2 sweeps on top of eachother for a more unique sound.
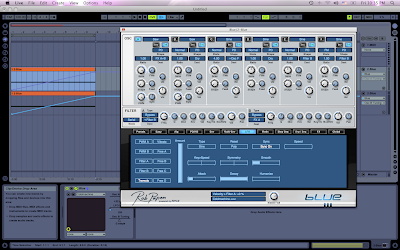
We will use this photo for further reference too. In my case, its an 8 bar loop rising. Now click play on your sequencer (within ableton). You should hear the sound rise from its LOWEST note to its highest. You can also define a different distance simply by changing the slope of the envelope if you would like a less dramatic change or a certain key to start or end on. By doing this way, you are doing the full range of the synth, from its lowest tone to its highest.
This is nice and all, but its time to make it sound really freaky. Referencing the same picture, you can see I chose the LFO tab on BLUE. Within that, you have many different LFO options. Turn one of them on. My favorite is the Tremolo, which makes a really nice pulsing LFO effect. Change the parameters to your likings. I like to make my sweeps in the same BPM speed as the tracks I am making (in my case, usually 128) and then sync the rate of the LFO with the BPM. That way, when I go to use the sweep within a track, it will match with the beat. Some important parameters within the LFO are as follows -
Speed (the speed of the LFO. It is really nice to also automate the speed just like you did the semitones for a nice speed up effect of the LFO)
Smooth - Very important to round off your LFO so it isnt so drastic. It may sound nice to have a drastic sweep all alone, but when you add it to a track, it will seem like to much. Smooth over your sweeps.
Attack & Decay - Also help to smoothen out the LFO. Play around with them. I always add at least a little bit to the attack.
Type - Defines the type of LFO. If you dont know about Waveforms...YOU MUST LEARN THIS! Search google, crucial to understanding synthesis.
Now, you have a nice wobbling sweep at this point. If you dont want wobble, shut off the LFO. It is just an option.
The next step is to add some really nice effects to make this more dynamic.
What you will want to do, is choose where your ocolators are pointing to (in the case of blue, you have the options of FX A, FXB or both). In my case, I am using both. Go up into the DEST part of OSC 1, and send it to FX A, B, or both. If you are using more than one oscolator, point them accodingly.
Then click on the little FX tab at the bottom of the blue like this -
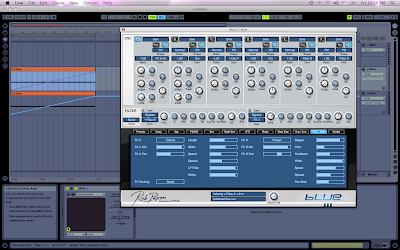
Now you have some options for some effects. In my opinion, these are some of the best effects to use for sweeps within blue
Chorus, Flanger, Phaser, & Autopan. You can try some others if you like too.
In the case of the Phaser & Flanger (my 2 favorites in combination with a chorus), it is really nice to automate the speed. In the case of a rising sweep, make it go faster...in the case of a declining sweep, make it go slower. It really adds to the fact that you are BUILDING UP the song, or BRINGING IT DOWN. You will have the play around with these effects to get a nice sound. It is always nice to use them in combination with a chorus to give your sweep some warmth.
Also try auto-panning it to add some stereo dynamics to it.
Make sure your have the FX MIX A & FX MIX B parts up within blue if you want the effects to take place.
These are obviously not ALL the possibilities, but you can play around within the synth to find out what you like.
Aside from the in synth sweep building, another key to a nice sweep is the use of filters. I like to use abletons built in filters, or the CAMEL PHAT plug-in (for another blog all together). Toss on a nice high pass filter to a sweep and automate it within ableton on top of your made sweep for a very nice fading effect. Remember to make your sweeps disappear within the same tonal range as the hit or upcoming part of the sound to make it sound as smooth as possible...unless you are looking for something more abrupt.
Remember to build one sweep on top of another for more unique sounds, and maybe even bit crusher one of them and destroy the fuck out of it. Sweeps are a place in music to let out your more crazy side. I like to think of them like a plane crashing or taking off...both very uneasy times for me in the real world.
Well thats about it for sweeps. There are millions of possibilities, I just showed you some of the fundamentals.
Peace!
FroBot


 Now, you are going to want to open any of the simplers within the drum rack (I usually do the first one)
 Now, what you are going to want to do is click the little button that says PITCH (it will turn yellow).
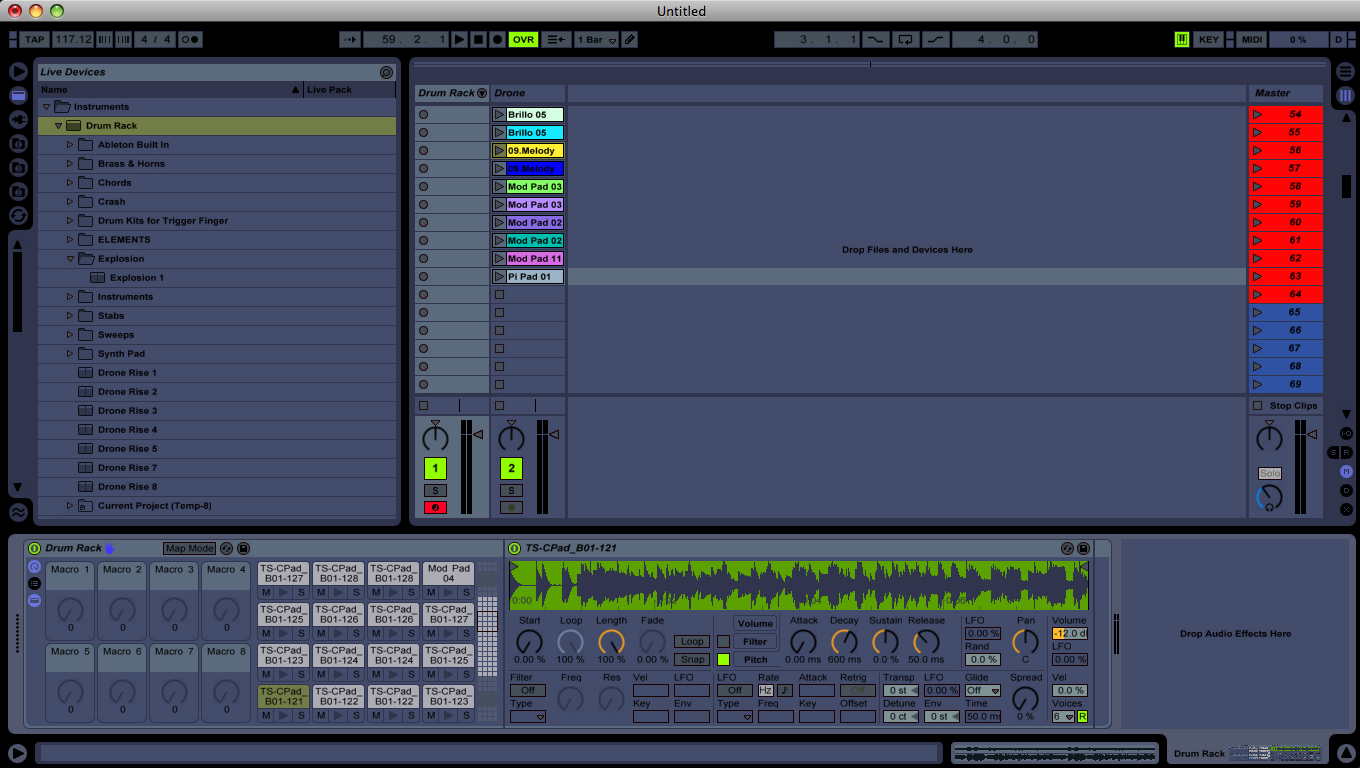 Now right click it and select "copy to siblings"
 Now you want to go to the ATTACK, DECAY, & SUSTAIN PARAMETERS and put them ALL THE WAY TO THE RIGHT SIDE. Each time, also right click and select "copy to siblings". You must do it EACH time on EACH PARAMETER.
 Now, the last thing you will want to do is going down to the little box in the bottom right (diagonal the transpose button) that says ENV. Put it all the way up to +48 and also select "copy to siblings"