Today, I am going to look at Ableton Live 8's built in reverb. This is not so much a tutorial, but a way for myself to look at it better. Like I mentioned last week, i'm hitting the books hard for the next few weeks, and I felt like I really didnt understand all of the reverb options. So, after reading a few books, and playing around with it a while...I wanted to note everything piece by piece to help me remember. I toss on a spectrum to give some visual feedback too.
Reverberation is a natural occurrence that happens after a sound leaves a speaker, and before it reaches your ear. It is not something that occurs in synthesis, and therefor, if we want to create it...we must do it artificially. When sound leaves a source, some of the vibrations (if you are close to the source) will reach your ears directly. The other sounds will bounce off other surfaces like walls, the ground, buildings, people, your own body, etc...and then reach your ear. This is what causes reverb. Our brains are actually so used to this occurrence, that we are able to determine our location size (such as a room, or in a dense forest) without actually using our eyes or other senses. Our brains actual enjoy this sound, and can give the deception of distance to sound. These sounds bounce off other objects like echoes...but so close in time to each other that they cannot be heard distinctly themselves. As you were to go farther away from a large reflective surface, the time between echoes gets larger as the sound must travel further. Eventually, you will be able to hear distance echoes in a delay fashion, just like when you yell into a valley.
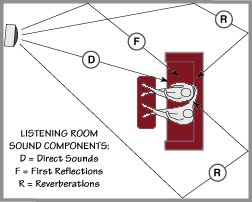
Now, what is even more interesting about reverb is how a wave reflects differently off of certain objects. Since a surface has a direct frequency response, depending on which frequencies the surface absorbs, it will reflect different frequencies. This is why you put padding on walls of a studio because the softer surface will absorb more of the high frequencies making less natural reverb in the room. If you were playing in a big church or something, it would be the opposite...whereas the hard walls reflect the high frequencies.
By using reverb correctly, you can trick the ears into perceiving audio as further away without actual lowering your volume fader. Half of music is the science, the other half is how our brain is tricked into perceiving it. We must understand both to understand reverb especially.
So lets begin. For the purpose of this tutorial, I have put in a snare hit so we can easily see the spectrum change with each snapshot I take.
 Here we are with the snare sample running, with the reverb off. There is a nice little peak around 1khz. Its easier to see the dry wet I will show in a minute if we switch the spectrum to "bins" instead of "lines".
REFER TO THIS AS NORMAL
 Now, when we put the reverb up to full blast on its normal settings (just drag and drop), you will see a db decrease, and also muddiness in the valleys of the frequencies. Also, if I were to show you a few snapshots of the same reverb in action, you would notice small, unpredictable changes in different frequencies of the waveform.
 You notice the longer valleys in the high frequencies are mostly gone with the reverb up. That is what reverb is doing to the frequency spectrum.
Now, we have a lot of control however on what exactly it is doing to these frequencies. Lets go through all the presets on the reverb. (left to right)
First, the whole reverb comes through the filters. You have a high cut and low cut. You can shut them off to save CPU power. Below them are your normal frequency and bandwidth options that are on normal filters. This can be really important if you actually want to kinda of "tune" your 1st reverb reflection to match other elements, or the element that you are putting the reverb on. I usually never start without touching this with a spectrum first.
Heres one with the highs standing out -
 Here is one with the lows sounding out -
(sorry, screenshot is hard to get the photos just right, but the top line is basically what you want to watch for)
I will shut off the filter for now.
Next is PREDELAY. Predelay is the time it takes from the initial sound to the first reflection that you hear. (kind of like how far away you are from the relective object) This is really important to get just right on a reverb. Sometimes, if your reverb predelay is set too quickly, it can muddy the attack sound of a certain instrument. However, if it is too long, it could interfere with an upcoming element in drum loop or a synth lead. You must use this with caution, and find the right distance for the first reflection. If you are just looking for a light reverb sound, a short predelay would be fine....but, you can make some GREAT sounding reverb effects with a long predelay. Also, if you have the dry/wet knob up the whole way while this is running, you will ONLY hear the first reflection, and not the initial sound...which will create a nice delay depending on the predelay time.
For the purpose of understanding this tutorial, you can set your predelay to a LONG setting so that you can hear the first reflection distinctly, and therefor understand what the reverb by itself sounds like. It will sound more like a delay, but it will be distinct.
Next we have the EARLY REFLECTIONS section. This helps sculpt the sonic properties of the first reflections that you hear. Lets start with SHAPE. You can read your ableton manual for the exact science of what it is doing...but from a users standpoint...with a lower setting...the reverb will be a little muddier and longer. With a higher setting, the first reflections are lower in db, softer, and faster. The long reverb does not seem to hang around as long.
SPIN - adds a little bit of modulation to the early reflections and is one of the less strong parameters in the reverb (in my opinion...I guess you could argue) You can control the modulation frequency and depth with the x - y axis.
GLOBAL SETTINGS - Eco, mid, high - These are performance settings. HIGH uses up more CPU, and the lower settings perform better when running tons of other things.
Size - Controls the rooms size. This is a really neat parameter. First of all, I think this makes it feel like there are pipes in the room or like, really metal type walls when set low. Very metallic sounding. With a higher setting, you get a more shifted reverb sound...a little more natural. One really cool thing about this is if you automate from RIGHT to LEFT...you can make almost a flange sounding reverb if done quickly on a stab or snare. This is a really creative part of the reverb. Also, depending on where you start the size and automate it LEFT TO RIGHT, you can create a new tones, and then SLIDE it into a washed out reverb. If you were to find the same (or harmony) pitch of the sound being reverberated, you can get a nice effect.
STEREO - This is pretty straight forward. All the way to the right, the left and right channels are giving a different stereo reverb sound (natural when in rooms because your ears hear different sounds reflected off of different objects depending on which side the reflection came from). All the way set to the left, the reverb is mono. This sounds very FAKE and unnatural...but can be useful in production.
DIFFUSION NETWORK - These settings connect also to the DIFFUSE knob on the right side (which controls in db, the volume of diffusion). The diffusion is the decay of the early reflections. There are low & high shelf filters which can help you set the frequency of your reverb. These are very important also when making a reverb sound nice. It helps to match the frequency with the actual frequency of the instrument....or, shut it off if you want it natural. There are frequency and bandwidth options on this also. This is also a nice parameter to automated on a stab or snare to get a nice FILTER within the diffusion. With both of the HIGH & LOW deselected, the filters are off.
Now, those filters are VERY MUCH affected by the DECAY TIME. This part is SO important to get just right. It is basically HOW LONG your reverb will last. By setting this to the left, you can get a nice, short, small, reverb to help polish up a stale sound...or, set it to the right...and get a loud, overlapping reverb sound that will definitely annoy the hell out of the neighbors. However, with the decay time set all the way to the right, and some automation within compose...some nice sweeps and other weird hits can be made if later modulated with an LFO, and given some volume automation.
You can see in this picture, that with the decay time set to the maximum, a constant sound is heard and doesnt really drop too far in db really. I know its hard to tell because mac snapshot doesnt react fast enough, but in this picture, where the DARK bars are sitting, is the lowest they are going without actually dropping away like the normal snare hit does.
 Freeze - This will freeze the diffused reverb when captured. This can get really annoying too as the sound will stay frozen until deselected. This has some creative uses in dance music. The cut, when on, makes it so if the reverb is activated again while frozen, it does not ADD more sound the the frozen reverb. If it is off, it will add on top of that reverb again and again as the reverb is activated.
FLAT - This is a really neat little parameter. It works in conjunction with your diffusion filter. If the FLAT is deselected, whatever frequency you have being changed in your filter...while frozen, will slowly lose energy in those frequency bands. If you could see a video of the spectrum, you could actually watch the high frequencies move slowly as they fade away. (cool effect) If it is on, those frequencies will remain the same.
Density and Scale control the diffusion just a little bit more. Sometimes when you play with these parameters, you dont notice much of a change. But, if you go to the SIZE knob, and make your room size really small, put your density up, and then move the SCALE knob...you will notice a big change. You can even automat the scale knob with a small room size for a nice flanger style effect to your reverb on a short hit. But when moving the scale, you can also change the diffusions pitch a little, so when using this in its creative form while making a track, be sure to check the pitch of the scale setting, especially if your reverb room size is small.
CHORUS - This is pretty straight up. Adds chorus to the diffusion...basic modulation when 2 sounds are played a little bit out of phase. You can also control the db level and frequency...same as a regular chorus x - y axis.
All of these are then controlled by the 3 knobs on the right hand size - REFLECT, DIFFUSE, DRY/WET.
Reflect is the reflecting level in db. You can make it louder, or softer.
Diffuse is the diffusion level in db. You can make it louder, or softer.
Dry / Wet is how much of the source signal and how much of the effect signal is being heard. To the left, no effect...only source signal. To the right, only effected sound, no source sound.
Well, that just about covers everything. Hope this helped. Make sure to shout what you know about reverb here, and make it echo!
Peace!
FroBot