
Today, I am going to tell you a super useful secret to making HUNDREDS of sweeps, risers, and fallers in minutes. I know we have all been there at some point...cant figure out how to make a nice sweep buildup for a track...so we go to google and start downloading sweep samples...only to hear that same sweep in someone elses track. With this little tutorial, we will make hundreds of unique sweeps in a matter of minutes, and be able to launch them in at any time.
A few things to keep in mind for this tutorial. I always use drum racks to organize my samples because I can launch them in with my launchpad. So in this tutorial, you can put as many samples as you like if you are not using a launchpad for previewing. I use 64 to match the launchpad.
OK lets start.
First, toss in an empty drum rack into a blank midi track.

Now, you are going to want to jump into your samples and search for LONG samples. Use the SIZE tab to organize by size. I was using a lot of drone and pad samples, but you can also use long synth sounds, or anything that is long and constant. Start dragging them into a blank audio track (or 10 blank audio tracks like I was doing today...I made over a 600 risers today). On the right, I change the color of the scenes in groups of 64 to make it easier for dragging and dropping into a drum rack when making many.
Now drag the samples from the audio track (or from the browser if you wanna do it one by one) into your drum rack. Again, I do 64 at a time to match my launchpad.
 Now, you are going to want to open any of the simplers within the drum rack (I usually do the first one)
 Now, what you are going to want to do is click the little button that says PITCH (it will turn yellow).
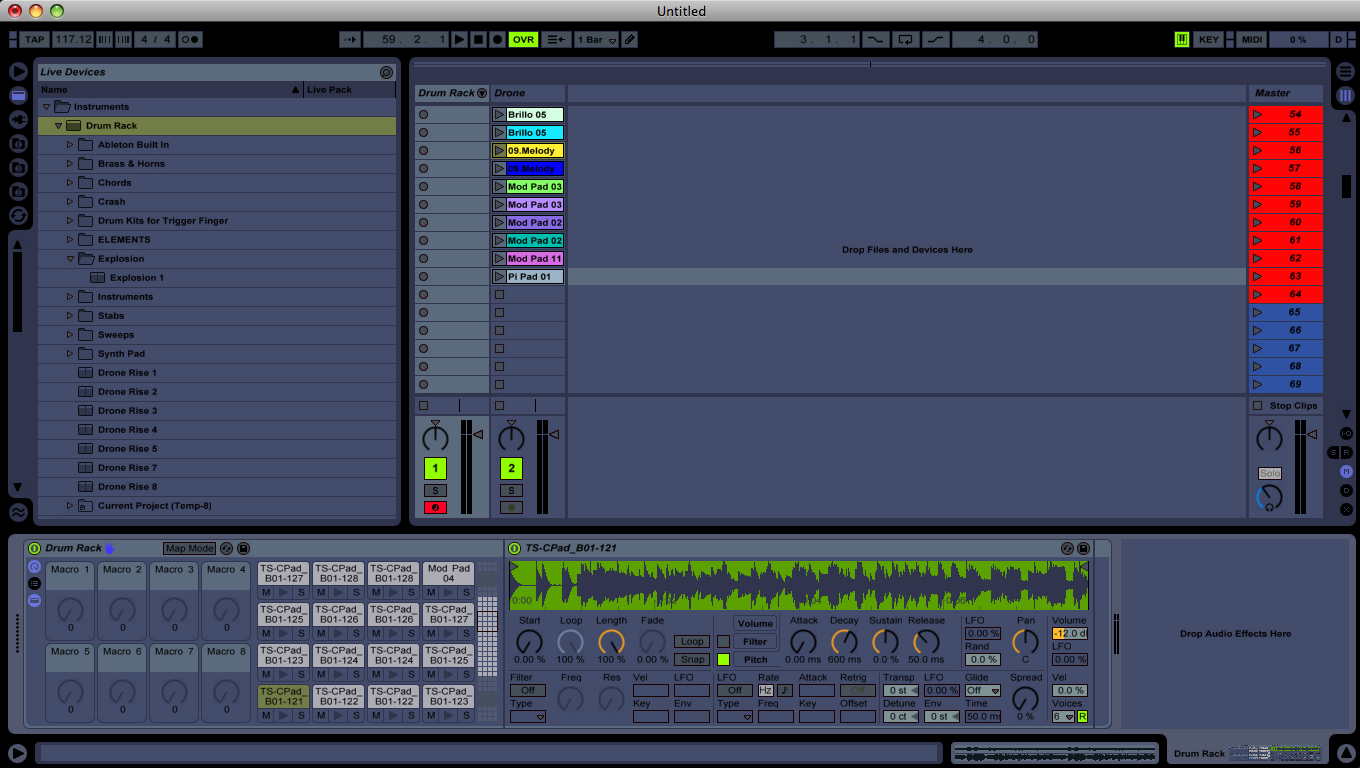 Now right click it and select "copy to siblings"
 Now you want to go to the ATTACK, DECAY, & SUSTAIN PARAMETERS and put them ALL THE WAY TO THE RIGHT SIDE. Each time, also right click and select "copy to siblings". You must do it EACH time on EACH PARAMETER.
 Now, the last thing you will want to do is going down to the little box in the bottom right (diagonal the transpose button) that says ENV. Put it all the way up to +48 and also select "copy to siblings"
Now, if you would want your risers to rise less, use a smaller parameter than +48. If you want it to FALL instead of RISE, go to -48 instead of +48.
Now test out a few of them by touching your keyboard or a midi controller. Now you have risers or fallers in all your drum rack. Save your drum rack for later use. WALAH!
Now, if you want to make your own instead of samples, just start making straight sounds out of a synth, save them as audio files, and drop them instead of samples into your drum track.
If you want more dynamics, you can use the filter envelopes, LFOs, etc too.
Nice huh! Easy too! Who would have thought making build ups could be so easy. I love simpler!
Keep makin tunes everyone!
Peace!
FroBot


8 comments:
Also if you find if you samples aren't long enough for the full +48 build. You can click on the Loop button to the left, & it will keep building until its gets to the full +48.
WALAH isn't a word. Dead french people everywhere are rolling in their graves.
Are there any examples of what this is suppsoed to sound like anywhere? I can't get it to work at all... the pitch doesn't rise it just starts at the transposed pitch.
Thanks for all the help man
I could have not done it with out you"
http://risez.blogspot.com/
Thanks, dude! Very helpful! (Not sure if you'll ever see this post haha)
Sure I will! Thanks man. I havent been writing much these days due to video...but still help out!
I dont have a clue of what you're telling here .. EASY .. ? Whahaha Throw in a video maybe i will try this method .. Just baught another sample cd ..Thats easy !.. ;) This is cool if you have nothing better to do ..
nice
Post a Comment