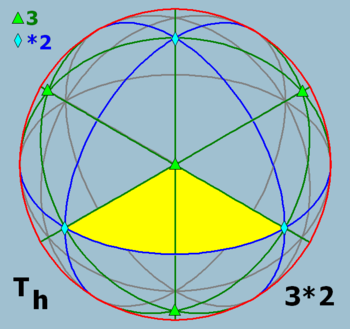
I love this picture. Because it really makes me think of my tracks in terms of panning and my automation. There are lines of symmetry all over this object, and I like to think of the panning plane in the same way. Some people might say its more of a 2D field, left to right, but...there is so much more to panning than just those 2 locations. There is also depth (z axis) (reverbs and anything adding distance to a sound). But what I am going to talk about mostly today is the symmetry of the panning. Where in fact you have your left and right sounds sitting, and how, if not looked at properly, will make your track lean to one side or another (which I dont usually desire, so I try to stay pretty symmetric. You can use it artistically of course).
For some sounds, staying straight up the middle is a good idea. Your kick & bass for instance are generally best sitting up the middle...especially in climactic parts. Its good to have the weight of the track distributed equally. Sometimes, its really good to throw a utility plug on your synth sound or bass sample, and choose either the right or left side only as the audio source. This will make sure the bass is in fact mono and evenly distributed. This does not mean that a stereo sounding bass wont work...because they can sometimes sound great...but, if you are using a rather sine wave sounding bass....its probably better just to use a mono source. You can add a little bit of your own stereo dynamics if you like, and make sure that it is evenly distributed over the left and right channels.
Now, where symmetric panning starts to become important is when you start throwing tons of stabby sounds around. Quick, low or no reverb, attacky sounding stabs especially, but anything can fall into this category really. When you start to make rhythmic variations to your stabs per left and right channel, its important to try to stay symmetric on your left to right bounces. It is especially import to figure out HOW MANY ACTUAL STABS are happening within a 4 or 8 bar measure, and try to make it symmetric from there. I will explain in a moment more in detail, but if you have an even number of stabs, its easier, but in times when you have an odd number of stabs, it might be good to reverse the automation for the next 4 bars so that it balance itself to 10 stabs over 8 bars, or something of the sort. Maybe I am getting ahead of myself, but lets look at some examples of my panning and why I did what I did.
These panning's are coming from my tracks.
So, this is a wider screen of one of the stabs I am using.
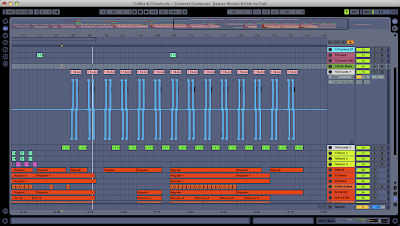 So if we zoom in on just 2 sets of those we get this.
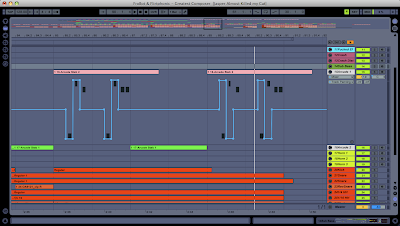 Now these are the little nintendo stab sounds at the end of this track.
They are little groups of 3. I know you see 7 notes per clip...but the last one is just a double hit. So look at the first midi clip. When working with 3, one of the main symmetric tricks to do is put ONE of them up the middle, and then another left, and another right. This is an EASY simple trick to make symmetric panning out of 3 sounds.
So in the picture, I do -
LEFT - RIGHT - CENTER, LEFT - RIGHT - CENTER
Now, this is a good start. But we are still left with a problem in our symmetric panning idea. Since you went in this order, you are ACTUALLY swinging the panning right a little bit. Because, if you look in my first clip, I did them BOTH LEFT-RIGHT-CENTER. So the swing still technically swings you FROM THE LEFT....(feel the motion) TO THE RIGHT....then SHARPLY back to center. So you still feel a RIGHT HAND SWING. So, the way you do this, is just REVERSE your automated panning on your next set of stabs, so it swings you the opposite way. Lets look at that same picture again now -

Look at the 2nd set of midi notes. Notice the panning is the opposite now. The 2nd set is
RIGHT, LEFT, CENTER, - RIGHT, LEFT CENTER
This will balance out the first one, and keep the mix symmetric.
Also, since I made my last hit in both groups - CENTER, I can apply a stereo effect like PING PONG DELAY to the last hit, to make them bounce rhythmically in a fading out, panned delay fashion. As I did in this picture of the same part -
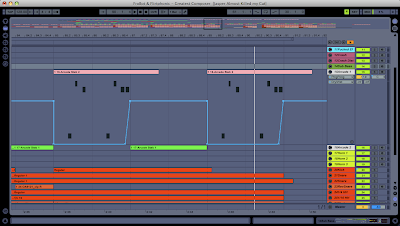 Just by THINKING in terms of symmetry, you can help to keep these stabs balanced. What is nice about MATH....is that anything x2 is an even number...so in MOST CASES with repetitive stabs, just doing the opposite thing on the next bar can help to keep it balanced.
Here is another case where by just putting the first and last hits on center helped make the whole thing symmetric. Its not prettiest draw automation, but you get the point. This will then repeat after this -
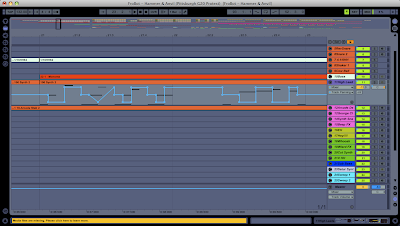
Now it is also safe to say that ANOTHER GOOD reason to put the first hit CENTER, and then the others on left right....is if you are making any kind of DELAY effect when the volume is being lowered. It helps to keep that stab at the foreground, and then let it disappear in a stereo ping pong delay. In other situations where you are using AUTOPAN, it is also sometimes good to use the automation of it and make sure the very FIRST hit is not panned. It will help the stab stand out on its own, and then disappear with volume and autopan (or a delay effect). This is totally situational, and half the time it will be good this way, the other half, direct stereo panning of the first hit will be more artistic and sound better.
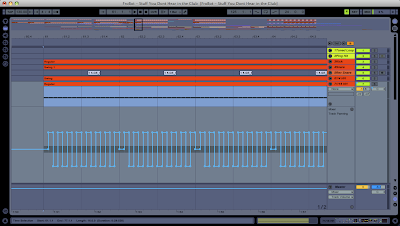
Next is an example of making sure your 1/16 note high hats "center panning" is on the kick, because I am SIDECHAINING my high hats with the kick...because I want it to compress the HHs when the kick hits so as not to ruin the dynamics of the powerful kick. But, we want to make sure that we arent just compressing the LEFT more than the RIGHT, or vice versa. So since I still want panning on my HHs, I just set the first one center (where your kick hits), then start panning it symmetrically until the kick hits again. I only did this on the FIRST kick, and not all of them, since the compressor will still compress rhythmically. I just want that first kick to be nice and even. See below -
Next is another example where the stabs were in sections of 3. So by using the opposite panning on the next section, it helped to balance them out -
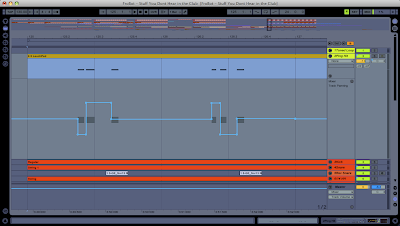
This idea can be applied to ANYTHING that stabs in ODD numbers. Just double it, and now its even, and will balance your track out in the long run.
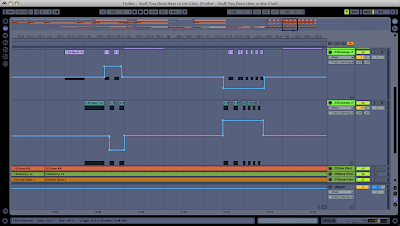
The next is an example where I was using 2 dubstep sounding wobble basses, and they were battling it out one after another. If you notice, I switch the automation between the 2 clips. This helped to balance the sound out also -
Anyway, I think those are enough examples. Its really not that hard of an idea to grasp, just check your panned sections, and listen specifically for symmetry. After you do it for a while, you will naturally do it. Also, I must note, in many situations, you may NOT WANT symmetry. It is an artistic choice 100%, just MY OPINION...is with that being said...many times you also WANT symmetry, and I find, more times than not, you will need to think about it. Especially for percussion items sitting in the background that are mostly creating rhythm. They typically should be symmetric...however, things in the foreground, like big builds, or quarky synth stabs....artistically, you can do with them however you please. Its part of the creative end of panning. You could be the Picasso of panning if you really wanted to make people uncomfortable in the club.
So, the examples I showed you may be hard to understand without audio...but, just take the concept and apply it. Interpretation is half the game in music....so just use the concept of symmetry, and apply it to your work. You may even be able to come up with your own results better than this!
Peace!
FroBot


4 comments:
A good technique for bass sounds with a bunch of mid and harmonics is to split the bass into two frequencies, the sub and the lo-mid/mid/hi. Then sum the sub to mono, and play around with stereo separation on the rest of the frequencies.
Splitting tracks by frequencies can be a good idea for a lot of reasons!!!
what would be your go to technique for splitting frequencies in Live?
use an audio effect rack with a series of eq eights to seperate the different frequency ranges
Post a Comment