There are 2 problems with the transpose. One being that you can only GENERALLY assign a knob to CLIP VIEW transpose, and not each clip. There is nothing you can do about this. But what is nice, is that if you have another button that highlights tracks for you...like clip view (i have one on each channel of my VCM 600)...you can then control the transpose of that particular clip. 2 buttons instead of one. You may ask, "Why do you need midipipe then?" That brings me to problem 2. For some reason, when you MAP OUT the transpose, you have no control over the distance variable of the transpose (like you do with most options within ableton). Dont ask me why, but that is how it is.
So what I have done is determined the parameters of the transpose within midipipe, and then my knob correlates with it.
Since moving a sample too far from its original state using BEATS warping mode (maintaining its key but speed only changed) sounds bad, I like my parameters to go -6, +6....because within a whole octave of sound...there are 12 notes. 0 being the middle, -6 is a half octave down, + 6 is a half octave up. This way, you can always find match the key of a sample, yet it doesnt go as far as +48 - 48 like normally set in ableton. This is VERY VERY handy, and I use my transpose button on EVERY sample when improv jamming.
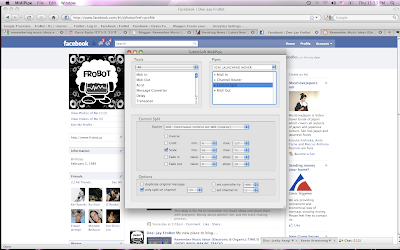
So how to do it. Well open up midi pipe, and make sure you have your ins and outs all set up correctly (look at my tutorial about mapping the VCM 600 w/ Launchpad to get more info, and omit the channel routing part, that will explain how to set up midipipe). Once you have that set up, toss in a CONTROL SPLIT. Now you need to know what midi channel and CC value the knob you are going to use for your transpose is. Just go into ableton, jump into map mode, map it to the transpose button, and remember the channel and cc value.
In the control splits SOURCE menu, select the CC value of the knob you are using. In my case, is is CC #20. Looks like this -

After that, click the box that says scale, and define the distance as MIN 55, MAX 71. That will send it at -6, +6. If you want a larger distance, just change the parameters to lower and greater distances correspondingly. Its some weird math, 127/48 or some shit like that. Best approach is to just change it, then move the knob within ableton to see how far it moves.
Anyway, after that, then click the bottom box that says "ONLY SPLIT ON CHANNEL"...and then set the channel of the knob that you are using. In my case, since its on the right side of the VCM 600...channel 13. Yours will be different.
You should be good to go. You can use this method to change the parameters of any midi knob within ableton if you like, although ableton does do a pretty good job at making most of them easily editable within their own mapping system. This is just one they either forgot, or figured people are all using a mouse...and omitted. I dont like to use the mouse for this, and think its one of the most important buttons when improving. Hope this helped!
Peace!
FroBot


No comments:
Post a Comment