 Last night, I had a great idea right before falling asleep, so I had to put it into action this morning. This is regarding your drum, snare, & HH tracks when making a track in ableton live.
Now, when making tracks, part of being a successful track maker, is having all the tools you need accessible and swappable at any time. Ableton does have a nice hotswap option that you can use to dig into your browser, but this is not fast enough for me, so I like to use my novation launchpad as a preview type tool, and mixed with a simpler, it can be great for preparing a template for your drum tracks making ableton template. I called this my "ELEMENTS SECTION".
In every track, you will have a KICK, high hats, and snares. So it makes sense to prepare your template with these in place since you will be using them 100% of the time. But you never know which one, and you may also want to have some control over the attack, release, pitch, lfo modulation, etc.
In my previous ableton track making template, I mentioned about having an ELEMENTS section. Since I primarily make house music, I wanted to have 4 tracks (dedicated to my VCM 600 right side) that controlled KICKS, SNARE, 1/4 HH, and 1/16 HH. These are basic elements that I need almost ALWAYS in a track. What I had before was pretty simple. Just 4 audio tracks, with the samples I wanted within them. Kicks on the 1, 2, 3, 4, - Snares on the 2, 4, - 1/4 HH on the 1.2, 2.2, 3.2, 4.2, - & 1/16 HH on all 16th notes (with changing velocity). This was nice, but I want to have more control and more options. Before, my elements section looked pretty simple, with some frequency shifters in each.
GOAL - Drum Racks with tons of samples. Make midi clips represent a standard use for each clip in the drum rack. Copy and paste to simpler. Many preset midi clips made in the simpler track. Full control over envelopes, filters, & modulation....QUICKLY!
My new idea is to do this. Instead of using 4 audio tracks...each element will be given a DRUM RACK, and a SIMPLER (beside eachother). If you look at the next photo, I have put a drum rack and simpler beside each audio track that was in my elements section (I will delete the original audio file track when finished, leaving 8 midi tracks -
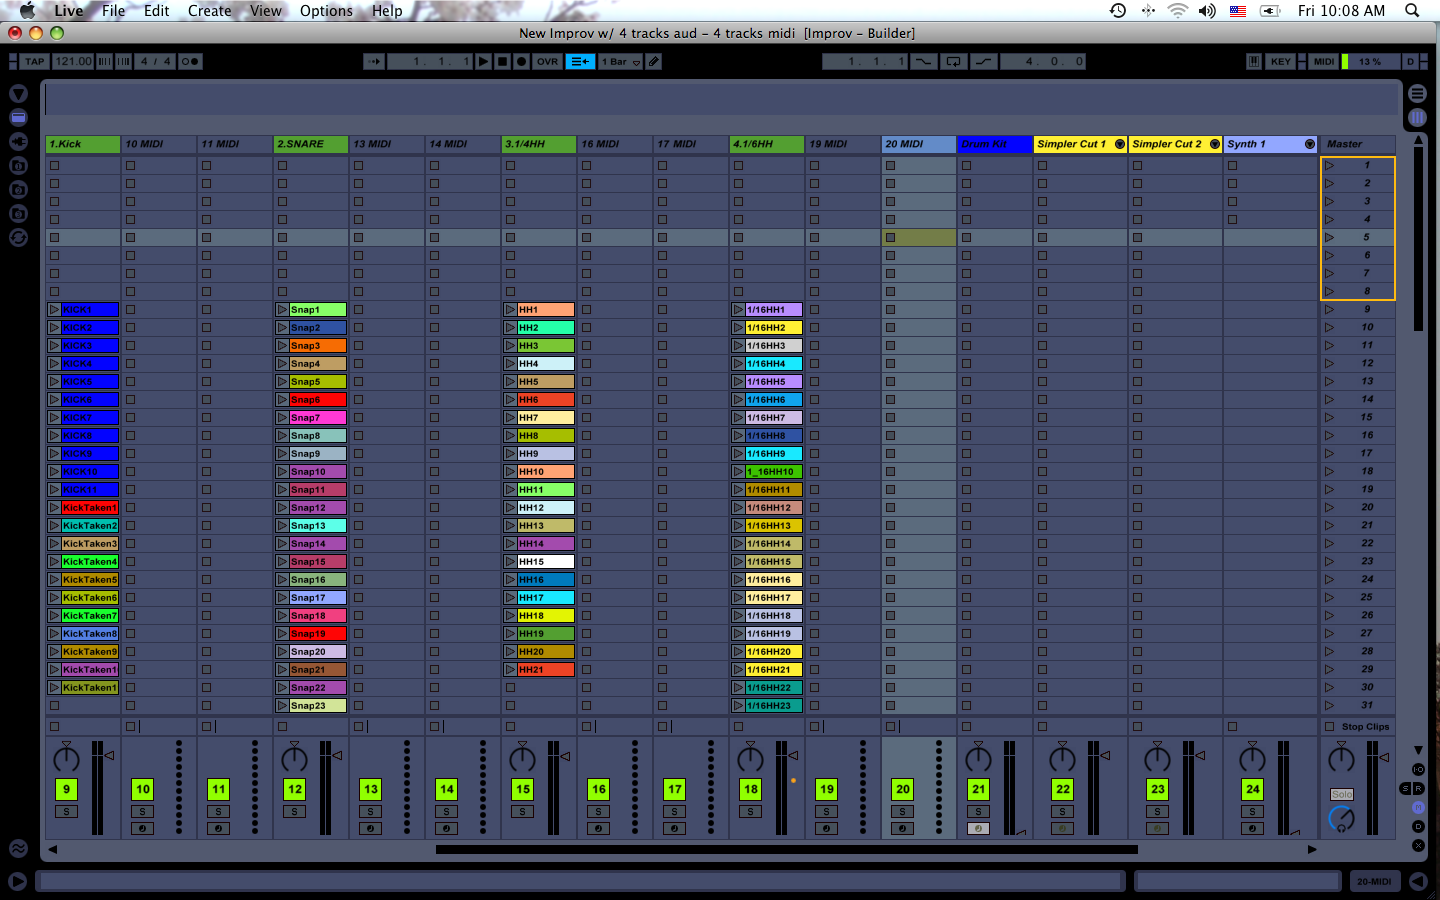 The tracks labelled in green are my past audio elements tracks.
Now, the idea here, is to be able to make drum racks full of each element, like kicks, snare, etc...and then be able to drop them into the drum rack from my browser. I could make TONS of racks (more options). I will only use 64 squares in the drum rack, because that will match my launchpad, and I will be able to preview them or even tap them in outside of 4/4 if I like. But since most of the time a kick will be 4/4, I want to prepare midi clips that will trigger each of those particular samples within the drum rack, effectively using a different sample within the drum pad each time. The reason I am adding a SIMPLER beside it, I will explain in a minute. Lets talk about each of these elements separately, and I will walk you through the ideas I had for each.
KICKS - So the first thing you are going to want to do is create a midi clip to trigger the first sample in your drum rack. Add a midi clip to your kick drum rack, and draw in a note where you the first kick is. Since I will use the launchpad to trigger these sometimes, my first note is C1. It looks like this -
 Now, make sure you dont draw in the note too short, or it will cut off any kick sample that happens to have a TAIL on it. Since I do house, there wont be any samples longer than my chosen size.
Next, we need to make copies of this midi clip, but instead of them being at C1, you need to make one to match EACH sample in your drum rack. I am making 64 of them for my launchpad, so I end on Dsharp6 (64 different midi clips). This is a little bit time consuming...copy, paste, transpose up, copy paste, transpose up (64 times). After this, rename your files and save. Mine looks like this -

Now, what you will want to do (I am going to do this later this afternoon because of my huge sample collection), is select many good kicks to put into your drum racks. You should SAVE these drum racks for later use...because they will be just drag and drop later. Fill your drum rack full of 64 drum samples, and now as you click any one of your midi clips, it will make a nice loop out of that sample...effectively auditioning tons of kicks right at your finger tips.
Now the reason we put a simpler in there is because sometimes, it will be nice to transpose the note of that sample. This is not so important with a kick because you can easily just transpose it within the drum rack sample...but in a minute, when we talk about High hats and snares, it will make more sense.
SNARE - Now, we need to do the same with the snares, but on the off hits (like in house music). Now in this case, I am going to enter 2 notes instead of one. The reason I am doing this, is because it is common in house music to have 2 of the same snares, but one with a quick release, and one with a long release to make a more bouncy sound. By adding 2 notes, I can later edit the clips envelope, and make one of the snares SHORT and one LONG, or any other effect I want to do between 2 snares. If you think you would need 4 instead of 2, go for it. I dont usually see the need to have 4 notes, just 2. Be sure to make your midi notes as long as possible because sometimes a snare sample can have a long reverb after it, and you dont want your midi note to shut off and cut the end of the snare sample. My first one looks like this -
 Now we need to do that same copy and paste thing 64 times for each pad in the drum rack.
COMMAND A is your friend here to SELECT ALL and do this more quickly each time. This can be really tedious, but its for a template, remember you will be reusing this ALL the time for making tracks. My snares now look like this -

I saved them and named them. Again, the coolest part if this is using the simpler after this, but I will explain this after explaining all the drum racks first.
1/4 HH - These are place on 1.1.3, 1.2.4, 1.3.3, 1.4.3. Again, must be long enough to not cut off long high hats sound. Here is mine -
 Now we need to do the same thing as we did with the kick and the snare, and make 64 of these matching the drum rack samples. Looks like this -
1/16 HH - Now this is the hardest of them all. Before I go too far, lets realize that we will NOT be using this drum rack (for any of the elements), but rather the simpler...so what you are hearing in the drum rack does not matter so much as being able to audition tons of samples quickly, and find what you want. So you pretty much need to be able to hear different types of sounds before they will go into your simpler track. The only problem with 1/16 HH's is that, when all played at the same velocity, it will sound like shit...even while previewing. So, for the purpose of them NOT sounding like shit, I decided to go with a house standard on my velocity of (LOUD, SOFT, SOFT, SOFT). This just makes it sound nicer while previewing. I will be changing it all around anyway in a minute, but for the purpose of the drum rack, lets do that. I decided on my velocity to be 96, 64, 64, 64. I know this may sound like shit, but again, we will be making presets in simpler for nice sounding ones. This is just to audition a 1/16 HH at anything but straight same velocity -
 Now we need to make copies of this 64 times just like the previous ones. Here is mine -
 Now you must keep in mind that your midi velocity will not take effect within your drum rack unless you have the velocity bar up to 100%. So, in the future, when you make your 1/16 note HH drum racks for previewing, you will need to move the velocity bar up to 100% on each of them when you make it, so you dont have to do it every time. DONT FORGET THIS...or else you will be preview flat, shitty sounding HHs. It is this little bar by the way (see the velocity of simpler in the bottom right corner) -
 Just edit that parameter of each drum rack pad before SAVING it, and it will be set each time.
NOW LETS GET TO THE FUN PART!!!! Now that we have our drum racks made for previewing each sample, we can now make clip templates within each simpler to change the way a certain sample that you choose will sound. Since your samples are originally in a drum rack, selecting a different note on a midi controller will start a different sample. What we want to be able to do is use that SAME sample, but be able to change the pitch of each. There are certain combinations for each element that will sound good, like using a harmonic of a sound, or an octave up....different velocities....MILLIONS of combinations. I will only show you a few because I will be spending about 5 hours or so on this section to make TONS of clip that will be different from eachother.
Now, I might be getting ahead of myself. Lets re-explain in more detail what we are doing here.
Since you now are able to hear different samples that are within your drum rack...looping with your music...this will help you choose the sound you want. Once you have selected a sound that you want, you will want to open up the drum rack pad of choice, and view the sample. Then, click the box around the sample, and click COPY. Then go into your simpler that is sitting beside that drum rack, and PASTE that sample into your simpler. (make sure the velocity bar is up to 100% on that simpler too, or else your veloctity presets you make in a minute will not take action.)
COPY -
 PASTE -
 Now your sample that chose from your drum rack is within your simpler. Now its time to make some clips to activate that differently, but pre-decided. The kick is probably the most boring, but easiest to understand. Velocity is not so important (although it can be for an experienced producer making kick rolls). But for now, the kick, we will just be making some different kick styles.
Lets now go back and create some clips in our simpler. Remember that C3 plays the sample in its original form...so we will draw in notes in C3. I also like to change the midi input of the simper to my midi keyboard rather than the launchpad because I can play sounds based off notes, but you can use anything you want really as long is its mapped in normal piano progression.
If my set is looking confusing to you, I am working within the track TO THE RIGHT of the BLUE LIST that says DRUM RACK. That is my simpler. In the first midi clip, i made a regular 4/4 kick on C3 and renamed the file "REGULAR" -
 In the next midi clip...I made it double speed and renamed the file to DOUBLE -
 In the next, I made it double the speed of that and called it QUAD -
 You should note that when making rolls like this, it is probably nice to change the velocity of some of the drum hits so it doesnt sound so stale ....or even edit the attack parameter in the clip envelope so they dont all sound the same.
Now, the possibilities are endless with this. You can remove a few kicks to make a more BREAK sounding kick, make super fast rolls, whatever you like. Edit the envelope to make it more dynamic too if you like. Make tons of clip presets that are ready to be used at any time if you like. You will never have to draw them in.
Its also worth noting that you can now DELETE your original DRUM RACK when making track because you will no longer need it if you have decided on a certain kick. JUST DONT DELETE it in your template....only on your NEWLY named file you are using for your particular track.
Now the kicks are pretty easy. You can apply the same concepts to the SNARES or the 1/4 HH. The only other one I want to talk about here is the 1/16 HH. They have MANY MANY options for different sounds...by using notes, velocity, and timing.
This is the main reason we are moving these into a simpler. Some of the best HH tracks can be made by using ONE HH sample at one pitch, and another one at another pitch. There are so many combinations for this...and you can make as many preset midi clips as you like.
Lets start with one that is the SAME as the one in our drum rack - I called this one REGULAR...even though the velocity is HARD, SOFT, SOFT, SOFT. That is what I consider to be regular in my production case -
 Now, we have 3 main options when playing with this one (not including what we can do in simpler).
1. Change the Velocity
2. Change the number of hits.
3. Change the Note.
Lets start with #1. The next file, I will make the same as the last, but just change some velocities of each note. In this photo, I changed it so it is HARD, SOFT, HARD, SOFT. I also renamed the file to VC1 (velocity change 1) -
 Now I will make many more of these. But lets move on to #2. Lets just remove some of those notes to get a different sound. I renamed it it R1 (removed 1) -
 That is a nice little change to the high hat sound to make it sound less boring for sure. You can make MANY MANY of these, each with different velocities too.
Last #3, and the coolest one of these. Now, since we are using a single simpler within its own track rather than within a drum rack, changing the note within the midi clip transposes the note up or down...so you can make it sound like someone is playing 2 different high hats at the same time. I renamed this NC1 (note change 1) -
 Now by mixing these 3 possibilies, you can make thousands of combinations of HHs. Make ones that you like, and then they can be played quickly depending on which sample you want to put in. GREAT huh!
Now, I forgot to mention one of the BEST parts about this. The fact that your sample is now within a simpler, gives you MANY more possibilites to change that sample (that impulse doesnt have). You can now change the attack, decay, sustain, & release of the sample. Also change the LFO, filters...basically ANYTHING within simpler. This gives you A LOT more control over the sound for sure! Make it sharper, longer, filtered...anything you want really! The possibilites are endless.
Now, just make tons of drum racks FULL of kicks, snares, & HHs...and your good to go! This is great for people with HUGE sample collections of kicks, snares, HH...you can just DRAG in a drum rack full of 64 different kicks....try each one, choose one, then choose a preset you made. You wont have to draw anything in (unless you want to change an old midi clip preset).
The best thing about this method is the speed that you can audition, test, and change different kinds of drum samples...on the fly. You can make tons of different midi clip options, and then apply them to different samples. It is really nice because certain styles of music (like house in my case) have certain elemental things within the drums. So you can make those elements in midi clip presets, and just change between them all on the fly. So many times, you will find yourself SATISFIED with a certain drum loop, without really trying it other ways. This way, you can try tons of possibilities (pre-decided), and then choose the best for the song you are making. You can always go in and edit one of the midi clips to get it EXACTLY the way you want.
Well I hope this helped. I just wrote everything down while I did it...so I will work out the bugs and maybe blog about it later! Enjoy!
Peace!
FroBot


3 comments:
Frobot -
Been following you for a couple of weeks. This is a really neat way of auditioning sounds without relying on the Hot Swap option, and also seems to have promising potential for integration into a Live PA (although how I'm not exactly sure yet...still wrapping my head around this post).
You mentioned that you've got gigs and gigs of samples - if you don't mind me asking, how do you organize them on your computer? I've only synthesized about a hundred sounds with Operator and even now my organization could use some help.
Keep it up - I'm learning a lot about Ableton from your notes. Really thankful for what you're doing!
My organization is purely through my racks and launchpad. I kind of roughly organize the samples I like...into drum racks, and save them. Then they are easily accessible via the drum racks. I have too big of a library to always search, so I just make nice racks with ones I like. That is the best way I think.
Hello Frobot
I think it might be very useful using this template in ableton, but I can´t understand the process well, would it be possible to make a short video explaining at least one example of this with the basic things to do?
I've read this article twice and haven't been able to apply it.....
Post a Comment